
Directional boards explained
There comes a point in every kiter’s journey when the twintip starts to feel like a ceiling. You’ve mastered edging, jumps, maybe even a cheeky backroll, but you keep watching those riders carving smooth arcs down a wave, switching stance mid-turn, and gliding with that surf-style flow. That’s where directional boards come in.
1. Materials and construction
A directional board’s soul lives in its core and layers. Materials decide not just how strong or light it is, but how it flexes, recovers, and transmits energy back through your feet. Unlike regular surfboards that only deal with wave power, kiteboards must handle constant line tension, landings from jumps, and higher speeds.
Main core types
PU (Polyurethane)
Classic surfboard foam with a smooth, predictable flex. It feels lively underfoot but soaks water easily when dinged. Heavier than EPS yet easy to repair. Many custom boards still use PU for its familiar feel and damping, though it’s less common in kiting where durability is key.EPS (Expanded Polystyrene)
Lighter, stiffer, and more buoyant than PU. Combined with epoxy resin, it forms the base for most modern kite surfboards. It handles impacts better but can feel slightly “corky” in chop because of its stiffness.Sandwich construction
A multi-layer build: EPS core, fiberglass or carbon fiber skins, and PVC or wood reinforcements. Brands like F-One, Duotone, and Appletree use this to create boards that are light, rigid, and highly resistant to heel dents. Sandwich builds also let shapers fine-tune flex by changing material thickness.
Reinforcements and lay-ups
Carbon fiber: Adds stiffness and snap for powerful turns and jumps. Used on performance-oriented boards like the Duotone Whip D/Lab or Core 720 IV. Too much carbon, though, can make a board feel harsh in chop.
Innegra or basalt fibers: Blend durability with flex for smoother riding. They’re often used in high-end wave boards such as the Cabrinha Method.
Wood veneers: Add natural damping and crack resistance while maintaining lively feedback.
Flex and feel
A stiffer board (carbon lay-up) reacts quickly and holds its shape at speed, perfect for powered freestyle or big surf. Softer boards absorb vibration, forgiving landings and choppy water. Most wave riders prefer moderate flex that cushions without feeling sluggish.
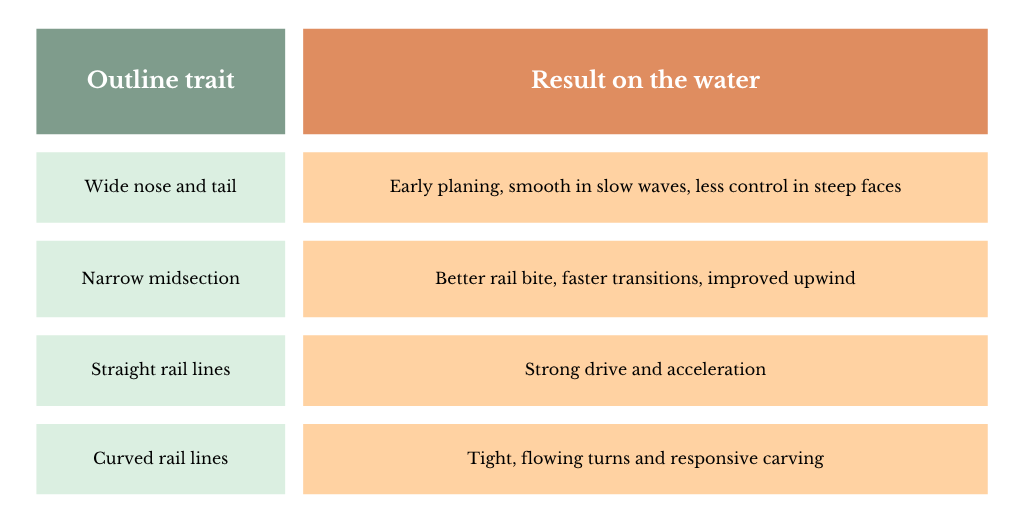
2. Board outline and shape
The outline is the board’s overall plan shape, the silhouette you see from above. It dictates how easily the board turns, holds speed, and manages drive through a wave.
Wide vs narrow outlines
Wide outline: More planing area and early lift. Feels stable and smooth through slow turns, perfect for small-wave days or light-wind strapless sessions. Boards like the F-One Mitu Pro or Duotone Whip thrive here. Downsides: harder to hold a steep line in fast, hollow waves.
Narrow outline: Tapered midsection and drawn-out rails improve grip and control at high speed. You can bury the rail deep for powerful carves and maintain hold in steep faces. The Appletree Klokhouse Noseless and Cabrinha Method are examples.
Curvature (template curve)
A board with more curve from nose to tail turns tighter but sacrifices upwind efficiency. Straighter outlines track better and maintain speed across sections but require more input to turn. Think of it like steering radius: curvy equals agile, straight equals drive.
Rails and plan shape interaction
The outline works with the rails to control release and grip. Wide boards with soft rails feel loose and forgiving. Narrower boards with sharp rails lock in for aggressive edge control.
3. Nose shapes

The nose sets the tone for how your board handles takeoffs, landings, and transitions. It decides whether your board slices through chop or skims over it, how much lift you get up front, and how forgiving your ride feels when you botch a landing.
Pointed noses
Think of these as precision tools. They cut through water smoothly and maintain control at high speeds, especially when dropping into steep waves. Pointed noses reduce swing weight, helping the board pivot faster during carves.
Best for: fast waves, down-the-line riding, riders who stay powered and precise.
Rounded noses or hybrid noses
Rounder shapes offer more surface area up front, which creates lift and forgiveness. They resist nose dives, glide easily through flat sections, and feel playful in small to medium surf. The extra volume makes strapless tricks and tacks smoother.
Best for: everyday conditions, mixed wave riding, strapless freestyle.
Full or Square noses
A fuller nose pushes even more foam forward. These boards plane early, recover from sketchy landings, and carry speed through slow or weak waves. However, they can feel harder to control in big surf because of increased lift and swing weight.
Best for: light wind, smaller surf and strapless freestyle.
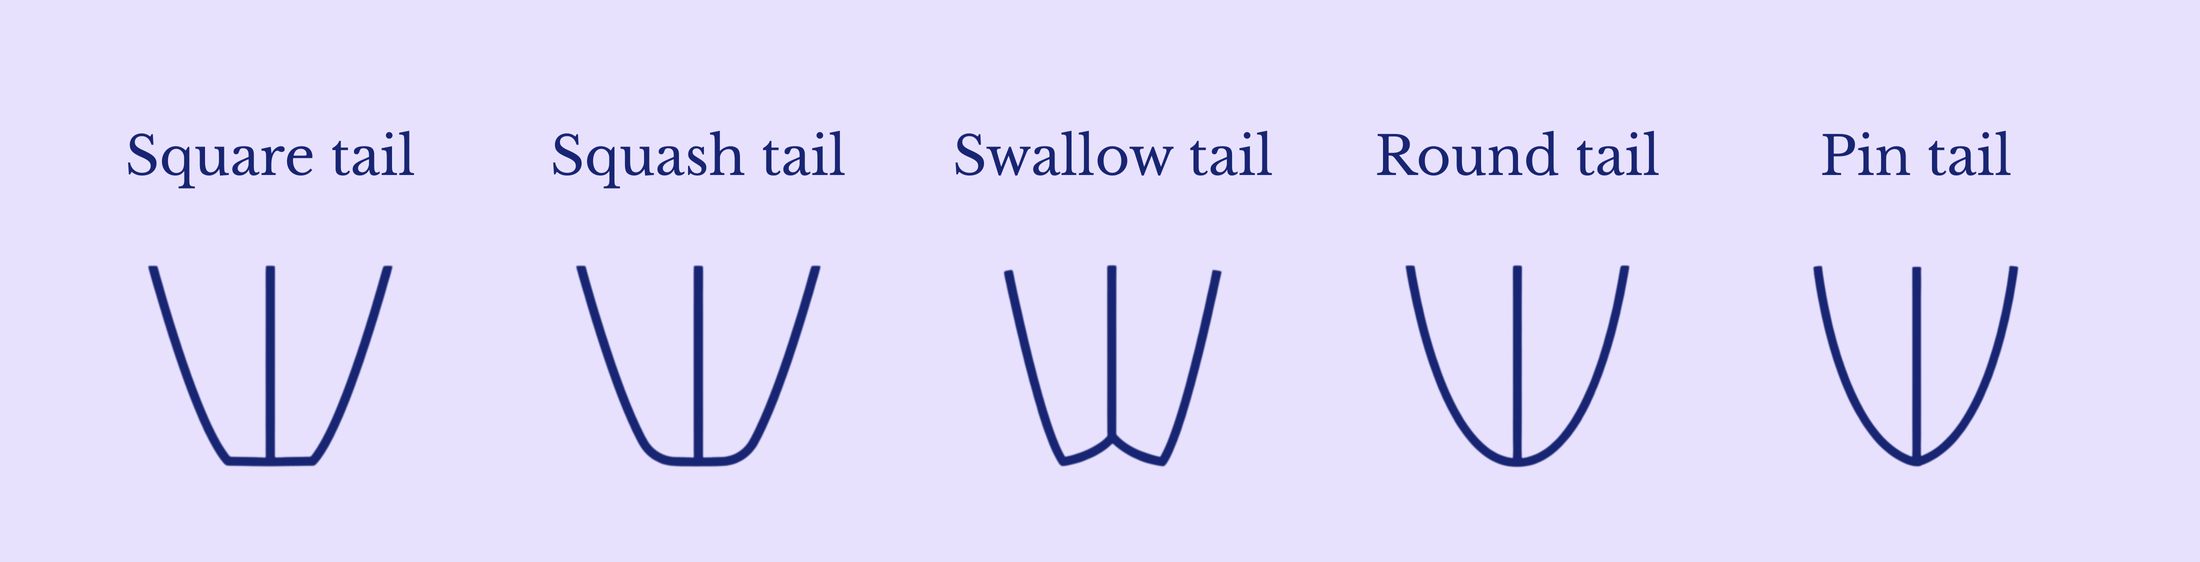
4. Tail shapes
The tail is the board’s steering system. It defines how water leaves the board, how tight you can turn, and how much grip or release you feel during a carve. Tail shape affects acceleration, drive, and control more than most kiters realise.
Square tail
This design offers plenty of surface area behind your back foot, giving instant planing and strong release. It accelerates quickly and creates a crisp, skate-like feel for strapless freestyle. The sharp corners allow water to break cleanly, boosting pop and speed, but they can feel twitchy in big surf.
Best for: strapless freestyle, small to medium waves, early planing.
Squash tail
A classic all-rounder. The rounded corners of a squash tail keep the looseness of a square tail but add control and smoother transitions. It provides a predictable pivot point in turns and works across most wave types.
Best for: all-round wave riders, anyone who wants balance between grip and freedom.
Swallow tail
This shape splits the tail into two points, increasing hold while maintaining looseness through turns. The reduced center area keeps the board fast, while the “swallow tips” bite into the face of the wave, giving stability when carving hard or landing tricks.
Best for: fast, hollow waves or riders who want grip and drive without losing flow.
Round tail
A smooth, continuous curve gives flowing turns and softer rail transitions. It maintains speed during long carves and adds control in bigger surf. The drawback is less pop for strapless tricks because of its gradual water release.
Best for: clean waves, down-the-line riding, and powerful carves.
Pintail
The narrowest and most directional tail. It holds the face of the wave like a rail and delivers unmatched control when you’re fully powered. The reduced area minimizes lift, so it feels slower in weak surf but rock solid in big conditions.
Best for: serious wave riders, high-speed control, and offshore winds.
Less common and hybrid tails
Diamond tail
Basically a square tail with its corners cut off. It keeps much of the lift and pop of a square tail while improving smoothness through turns. The sharper central point offers quicker release than a squash.
Best for: riders who want balance between speed, lift, and carve precision.
Thumb tail
A mix between round and squash tails, with a subtle curve that keeps control in larger surf but turns faster than a pure round tail.
Best for: medium to large surf, riders who like a forgiving yet precise feel.
Bat tail
Recognizable by its winged tips, the bat tail adds stability for strapless landings and gives a loose feel while still biting into the water when you push hard. It’s flashy but functional.
Best for: strapless freestyle or small playful surf.
Wing tail (or winged swallow)
A tail that suddenly narrows after a small “wing” step. This creates extra width for lift in small surf while allowing the rear section to stay narrow for grip. It’s popular for boards that need to balance planing with control.
Best for: variable conditions, light wind wave riding.

5. Rocker profiles
The rocker is the board’s bottom curve from nose to tail. It decides how your board moves across water, how easily it planes, and how smooth or snappy your turns feel. In kiteboards, rocker is a delicate balance between speed, control, and forgiveness.
Flat rocker
Flatter boards sit higher on the water and plane quickly, which means more speed and better upwind drive. But they also feel stiff in choppy conditions and can catch the nose in steeper waves. Ideal for light wind, flatwater or small mellow waves.
Medium rocker
This is the all-rounder curve. It gives early planing, smooth transitions, and control at both low and high speeds. Most kitesurf-specific directionals use medium rockers because they handle a wide range of wind and wave conditions.
High rocker
A pronounced curve makes the board fit naturally into steep waves and land softly after jumps. It trades speed for control and maneuverability. High-rocker boards need more kite power to get going but reward you with buttery turns and confidence in powerful surf. Perfect for down-the-line waves and powered sessions.
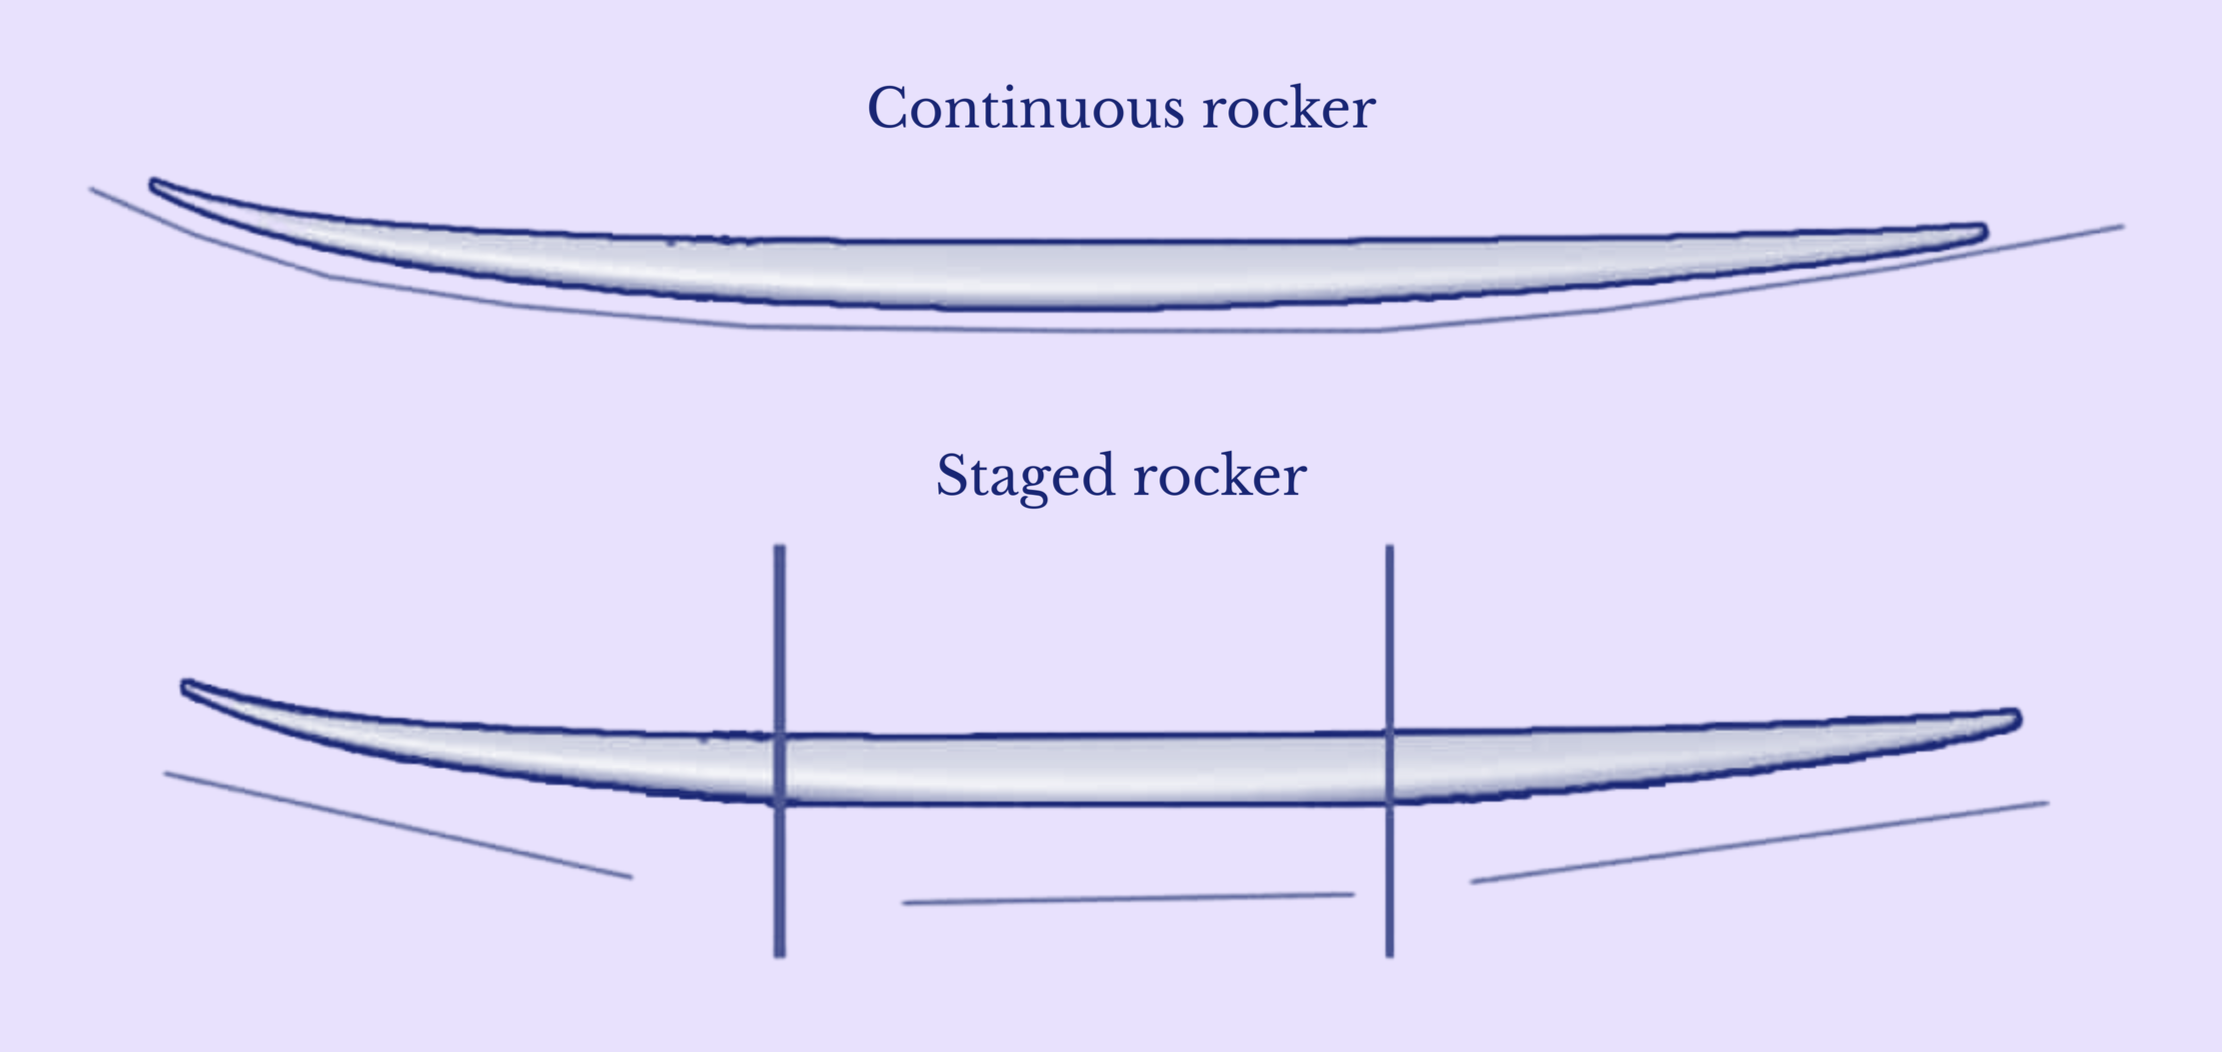
Continuous vs staged rocker
Continuous rocker: smooth, consistent curve from nose to tail; creates predictable, fluid turns and a natural feel in waves.
Staged rocker: flatter midsection with curve at nose and tail; gives a fast center section with extra lift at the ends, ideal for strapless freestyle and early planing.
6. Rail design
Rails define how water flows off your board, how deeply it grips, and how easily it releases during turns. Even a subtle change in edge shape transforms how a board feels. Directional boards use rails strategically: soft up front for forgiveness, sharper at the back for drive.
Soft rails: Rounded edges that blend smoothly into the board’s deck. They allow water to wrap around the board, giving a forgiving feel and smoother transitions. Perfect for small waves, beginners, or strapless freestyle, where you want a looser, skaty sensation.
Hard rails: Sharp edges near the tail let water break cleanly for more grip and speed. Hard rails hold the line when carving or loading up for a jump. Most kite surfboards have hard rails from the back foot to the tail for control.
Tucked edges: A “tucked” edge softens the rail under the front foot and sharpens it near the tail. This transition blends forgiveness with drive, allowing smooth takeoffs without losing bite on turns. Nearly every modern kite surfboard uses a version of this layout.
50/50 rails: Symmetrical rails, round from top to bottom, like classic longboards. They give stability but reduce edge control at speed. Rare in kiting except on fun or cruiser shapes.
Down rails: Rails that drop quickly from deck to bottom, forming a crisp edge along the waterline. They promote speed and quick release, common on high-performance shapes but are slightly technical.

Rail volume and thickness
Thin rails slice cleanly through water and hold better in turns but can feel less stable when standing still. Thicker rails float more and help with early planing but reduce edge bite. Most brands thin out the rails toward the tail for precision while keeping volume near the front for stability.
7. Length, width, and volume
A board’s dimensions decide how it behaves in the water, how quickly it planes, how easily it turns, and how stable or agile it feels. For kitesurfing, it’s all about finding the balance between control, lift, and speed.
Why the weird measurements?
Directional boards follow surfboard tradition, which uses feet and inches instead of centimeters. This comes from surfing’s roots and shaper culture. It’s easier for shapers to communicate small size tweaks (like 5’3” vs 5’4”) when boards are handmade.
Length
Directional kiteboards are generally short. Most range between 5’0” and 5’10”, with compact designs favored for modern strapless riding.
Shorter boards (4’10”–5’4”): Quick, snappy, and easy to throw around. They fit into tight waves and stay manageable when overpowered. Perfect for strapless freestyle or playful small surf.
Medium boards (5’4”–5’7”): The sweet spot for most riders. They offer enough rail for control and speed, but remain agile for carving and tricks. Great all-round choice for varied spots and wind ranges.
Longer boards (5’8”–5’10”): More drive and flow at speed, especially in bigger or more powerful waves. They track better and hold a steady line but feel less nimble for freestyle.
Boards longer than 5’10” are rare in kitesurfing because we don’t paddle. You don’t need the extra length or buoyancy of a classic surfboard, the kite provides the pull.
Width
Width affects stability and planing speed.
Wider boards (18.5”–19.5”) plane earlier, glide easily in light wind, and feel stable underfoot. They’re great for beginners or riders who spend time in small, weak surf.
Narrower boards (17”–18”) give more edge grip and control at higher speeds or in steeper waves. They cut through water smoothly but need more power to stay planing.
Volume
Volume, measured in liters, reflects flotation and lift. Since kitesurfers rely on wind rather than paddling, you need less volume than a traditional surfer.
Typical ranges for kitesurfing:
Light riders (60–70 kg): 21–24L
Average riders (70–85 kg): 23–27L
Heavy riders (85–100 kg): 26–30L
Shapers create volume by balancing thickness, width, and rocker. More foam in the midsection adds lift and forgiveness, while thinner tails and noses improve control. The goal is to keep buoyancy where you need it (under your front foot) without losing feedback through your back foot. EPS foam adds slightly more flotation than PU for the same shape.
How to adjust your board size
Smaller or lighter riders should downsize length slightly (around 5’2”) and choose less volume for easier control in strong wind.
Heavier riders benefit from a bit more width and volume for early planing and smoother tacks.
Keep in mind that volume placement matters: more under your front foot means balance, more in the tail means speed.
8. Fin Setups
Fins are your underwater steering system. They define how your board grips, releases, accelerates, and pivots. For kitesurfing, fins must handle extra side force from the kite and maintain control during high-speed turns or landings.
Thruster (three fins)
The go-to setup for wave riding. The center fin adds drive and stability, while the side fins control the turn radius. It balances grip and release, letting you carve predictably while staying locked into the wave face.
Quad (four fins)
Faster, looser, and more directional. With no center fin dragging, quads accelerate easily and hold speed in down-the-line waves. They also track incredibly well in steep, hollow surf. However, they can feel less pivoty in small waves and more technical at slower speeds.
Twin (two fins)
Loose, fast, and playful. Twin fins give a skate-like feel and make transitions effortless, great for strapless freestyle and fun surf. They lack the control of a thruster but feel smooth in smaller waves or when you just want flow.
Five-fin options
Many boards come with five fin boxes so you can choose between setups. It doesn’t mean using all five, it means flexibility. Switch between thruster or quad depending on your session goals.

Fin size and rake
Larger fins: more hold and stability, ideal for powerful conditions.
Smaller fins: quicker release and easier slides, good for freestyle.
More rake (angled back): smoother, drawn-out turns.
Upright fins: tighter, snappier carves.
Fin placement
Moving fins forward loosens the board, making it turn easier. Moving them back adds drive and control. Many riders experiment with 3–5 mm shifts to fine-tune their feel.
Material differences
Plastic: affordable but flexy, less responsive.
Fiberglass or honeycomb: lightweight, stiffer, and faster reacting.
Carbon: ultimate stiffness, sharp feel, and best for heavy riders or powered conditions.
9. Deck and pad design
The deck is your connection point to the board, how it’s shaped and padded can make or break your control. Modern kite surfboards use refined deck contours and traction systems designed for balance, grip, and comfort.
Deck shapes
Flat decks: Keep your stance low and stable. They offer a solid, even platform for both strapped and strapless riding. Common on freestyle-focused boards.
Concave decks: Slightly lowered under your feet, concave decks lock your stance into the board and improve balance when riding strapless. You feel more “inside” the board, not standing on top.
Domed decks: Rounder across the width. They improve comfort underfoot and let you shift easily between heel and toe pressure. Favored on pure wave boards for a flowing surf feel.
Traction pads
Pads matter more than you think. They affect grip, comfort, and feedback through your feet.
Full deck pads: cover most of the board, providing maximum grip for strapless riders. They protect the deck from dings caused by hard landings or knees.
Split pads: usually a tail pad and smaller front pad, leaving the middle bare for wax. Common on wave boards where riders want tactile feedback and easy stance adjustments.
Kick tail: the raised back edge that stops your foot from slipping off during turns and aerials.
Arch bar: a raised ridge running down the center of the pad for toe placement and control when strapless.

Pad texture and density
Softer pads absorb chop and landings better, while firmer ones offer more direct feedback. Coarse textures give excellent grip but can eat your knees if you crash often. Smooth pads feel nicer for long sessions but may need occasional wax to boost grip.
Wax vs pads
Some purists still use wax for its natural stick and freedom to move. It’s lighter, but you’ll need to reapply often, and it’s messy in warm climates. For kiting, pads are more practical, they stay consistent and handle water pressure better.
10. Bottom contours
Flip your board over and you’ll find one of the biggest performance secrets hidden underneath. The bottom contour controls how water flows along the board,it defines lift, grip, speed, and how smooth your landings feel. Even tiny changes make a big difference.

Flat bottom
The simplest design and often the fastest in a straight line. Flat bottoms plane early and keep speed in light wind or small waves. The trade-off is less grip and a harsher feel in choppy water. Ideal for light wind and flatwater.
Single concave
A shallow scoop running through the center of the board. It channels water under the midsection, increasing lift and softening landings. It’s smooth, predictable, and used on most all-round boards.
Double concave
Two smaller concaves split by a central spine. This design accelerates water flow and adds drive through turns, while still softening landings. It keeps the board fast but grippy.
V-shape
A slight ridge running down the middle that angles water out toward the rails. It helps the board roll smoothly from rail to rail, making turning effortless. Too much vee, though, can slow down planing.
Single-to-double concave
One of the most popular modern combinations. The nose starts with a single concave for lift, blending into a double concave near the tail for grip and smooth water release. It’s fast, smooth, and works in almost any condition.
Channels
Grooves molded into the bottom (usually near the tail) for added traction and control. They help when riding finless or loading up for jumps. Channels direct water flow like mini fins, improving upwind drive and landings.
Concave depth and entry
Shapers also adjust how deep and where these contours start:
Deeper concaves: more lift and control but slightly slower.
Shallow concaves: faster, looser feel.
Forward entry concave: early planing and stability.
Tail concave: tighter turns and better grip.
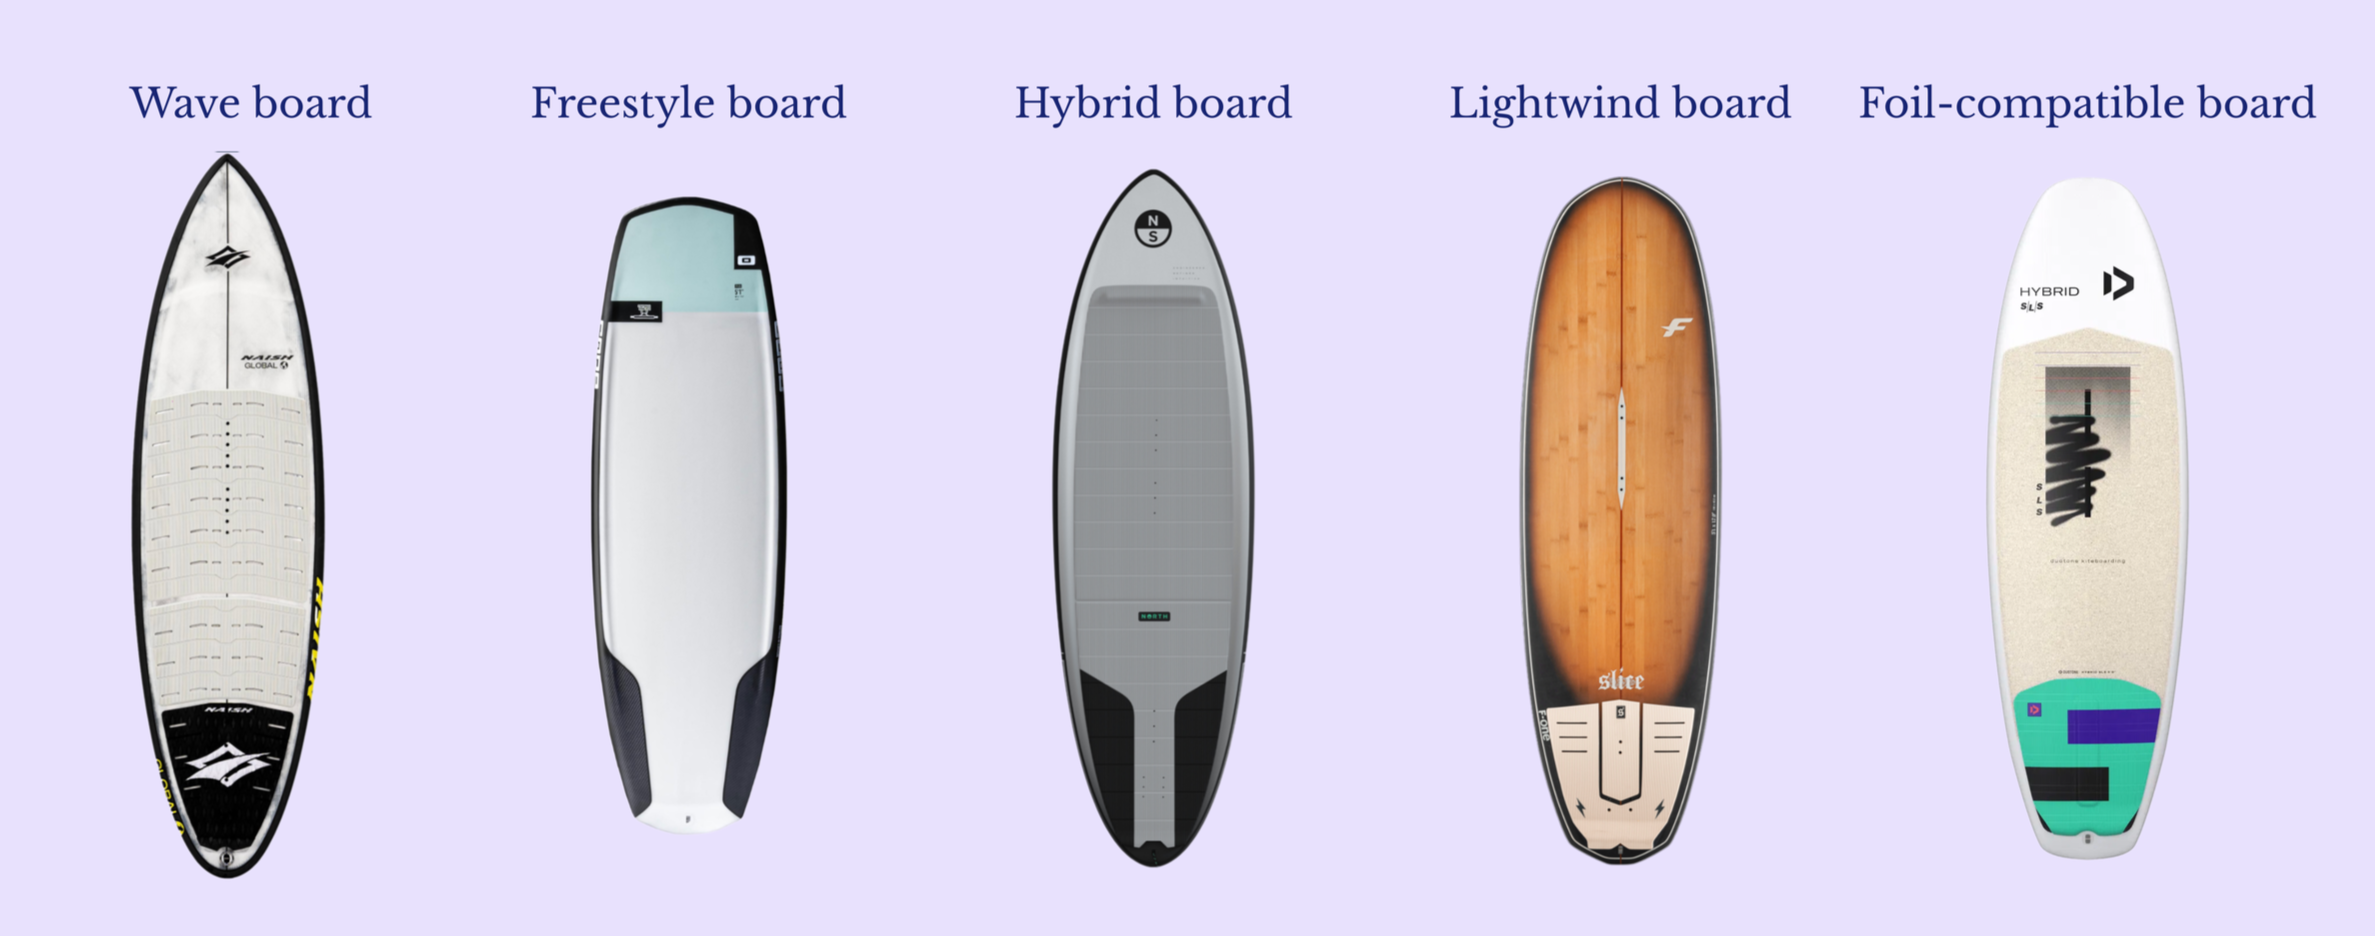
11. Types of directional kiteboards
Not all directional boards are built for the same purpose. Some slice down waves like scalpels, others pop and spin through freestyle tricks. The right one depends on your riding goals, local wind, and how you like to use your kite’s pull.
Wave boards
Classic surf-style shapes built to carve, not jump. They feature moderate-to-high rocker, narrow outlines, and thinner tails for control in steep waves. Wave boards excel in side-shore or offshore winds, where you can ride powered by the wave rather than the kite. Think Naish Global, North Charge and Duotone Blur.
Strapless freestyle boards
Compact and reinforced for impact. These boards are shorter, flatter, and wider than wave shapes, with durable sandwich constructions and strong rails. They’re tuned for tricks with rotations, flips, and aerial transitions, and for landings that would destroy a normal surfboard. Think F-One Magnet, Duotone Whip and North Comp.
Hybrid boards
Blend the best of both worlds. Slightly longer than freestyle boards, slightly flatter than pure wave boards. They ride waves but still pop well for strapless tricks. Hybrids are great one-board quivers for people who want to do a bit of everything. Think North Cross, Core Badger and Naish Komoko.
Lightwind boards
Big, buoyant, and wide. Designed to get going early when everyone else is still pumping their kite. They’re often longer and flatter with generous volume to keep you gliding through lulls. They won’t turn as tight, but they’ll save your session. Think Appletree Pilot and F-One Slice.
Foil-compatible boards
Some directionals come with foil mounts or dual-purpose designs. They’re shorter, reinforced around the tracks, and balanced for both fin and foil setups. Great for travelers who want one board for multiple disciplines.
12. Straps, leash, care, travel, and durability
Directional boards aren’t cheap, and they’re not invincible. A few smart habits can double your board’s life and save you a lot of money and stress in the long run.
Riding with straps or no straps
Choosing between straps and no straps completely changes how you ride. It’s not just about preference, it’s about what kind of control and freedom you want from your directional board.
Riding with straps
Straps lock your feet in, giving leverage and control through heavy chop or big turns. They make it easier to edge hard against the kite, boost higher, and stick landings in powered conditions. Many wave riders still use front straps for precision and back-foot control in steep surf.
Riding strapless
Riding strapless opens up a new world of style and creativity. You can move your feet freely, adjust stance mid-ride, and work the board like a true surfboard. It’s perfect for wave riding, light-wind cruising, or freestyle tricks.
Hybrid setups
Many riders use a front strap only, it keeps front-foot stability for drive through turns but leaves the back foot free for movement and tricks. Some boards come with multiple insert options so you can experiment with your stance or ride fully strapless when conditions allow. And some boards don’t have an insert so you need to ride it strapless.
Leash or no leash
A long-standing debate in the kite world.
With a leash:
You’ll never lose your board after a crash, but there’s a catch, literally. In kitesurfing, leashes can turn dangerous fast. When the kite pulls unexpectedly, the board can snap back toward you like a projectile.
Without a leash:
Safer, cleaner, and what most riders use. You’ll need to master body-dragging to recover your board, but that’s a skill worth having anyway.
Middle ground:
Never use it but if there're rocks at the shore, big waves or an offshore wind a leash can save you. But make sure to protect your head for that boomerang effect.
Board care
Directional boards take more impact than any other kite gear. Treat them well and they’ll last for years.
Rinse with fresh water after every salty session.
Avoid leaving in direct sunlight; heat can delaminate epoxy and soften pads.
Check for cracks or pressure dings and repair early before water seeps in.
Replace fins carefully; over-tightening screws can damage fin boxes.
Small dings can be fixed with epoxy repair kits. Anything deep or near the rails is worth getting done professionally.
Travel and packing
Traveling with a directional means extra care. Airline baggage handlers don’t share your stoke.
Use a padded surfboard bag with a minimum of 5 mm padding, preferably 10 mm for flights.
Remove fins and pack them in a separate pouch.
Use clothes, towels, or wetsuits as padding inside the bag.
Add cardboard or foam blocks around the nose and tail.
Tape zippers shut so sand and salt don’t corrode them during long trips.
Durability and lifespan
High-end sandwich and carbon boards can last for years, but lighter builds need gentler handling. Common weak spots are under your front foot and near the tail where you land jumps.
Tips for longevity:
Avoid jumping on fragile surf-style boards.
Don’t stand your board on its tail for long periods, it crushes the foam.
Store flat and dry, ideally in a ventilated bag.
Repair pressure dents early; water damage ruins performance fast.
With proper care, a good directional can easily last 3–5 seasons, sometimes more if you’re not sending strapless loops every day.
13. Choosing your next directional
Choosing a directional isn’t about chasing hype or colors, it’s about matching your board to your wind, your waves, and your way of riding. Every shape, tail, and contour we’ve talked about connects to how you like to move on the water.
Step 1: Know your conditions
Start with where you ride most.
Choppy beach breaks or small waves: look for compact, wider shapes with moderate rocker and decent volume. You’ll want something forgiving that pops easily and planes early.
Clean, powerful waves: go for narrower boards with more rocker, sharp rails, and a balanced outline for control at high speed.
Flatwater or light wind: aim for flatter rockers, fuller noses, and more width for stability and speed.
Your local wind direction also matters, side-onshore spots prefer boards with grip and drive, while cross-shore or offshore setups reward smoother carving shapes.
Step 2: Be honest about your riding style
Wave purists should pick boards with medium-high rocker, tucked rails, and thruster setups.
Freestyle riders will love compact, strong boards with flatter rockers, quads or twins, and reinforced tails.
All-rounders should aim for a hybrid, moderate everything and durable construction.
Step 3: Match it to your size
Smaller riders (under 70 kg): shorter, thinner boards (around 5’2”, 22–24L) feel more alive.
Medium riders (70–85 kg): mid-range boards (5’4”–5’6”, 24–27L) handle everything.
Heavier riders (85–100 kg): go a bit wider and thicker (5’6”–5’8”, 27–30L) for early planing.
Remember, your kite gives power, your board just manages it. Bigger isn’t always better; control is what makes a board fun.
Directional boards vs surfboards
A lot of kiters start out riding old surfboards, and yes, you can kite with one. But it’s a compromise.
What’s different:
Construction: Surfboards are made for paddling, not the pull of a kite. They’re lighter, softer, and can snap easily under kite load or landings. Directionals use stronger sandwich or carbon builds and reinforced fin boxes.
Rocker and rails: Surfboards usually have more nose rocker and softer rails for wave entry, which slow them down when powered by a kite. Kite directionals have flatter midsections, sharper tails, and tucked rails for grip and efficiency.
Weight and stiffness: Directionals are slightly heavier and stiffer, giving more control at speed and less flex under load.
Fins: Kiteboards use stiffer fins for better drive under constant pull; surfboard fins can feel wobbly or even break under kite pressure.
Pads and straps: Surfboards are waxed; kiteboards use traction pads and have inserts for straps or leash mounts.
So if you’re experimenting, borrow a surfboard to start, but if you fall in love with riding waves or strapless tricks, upgrade to a real directional. Your kite will feel smoother, your lines will stay tighter, and your board will stop feeling like it’s made of eggshells.
Step 4: Don’t forget feel
Specs and shapes matter, but the feel is what counts. Two boards can look identical on paper and still ride completely differently. Whenever possible:
Demo before you buy. Most kite shops or demo events let you test popular models.
Try different setups. Swap fins or adjust their placement, small changes can transform how the board rides.
Listen to your feet, not the marketing. The right board feels intuitive; you stop thinking about it and start riding better.
Step 5: Build your quiver smartly
If you can only have one directional, choose a durable hybrid or compact wave board that fits your main conditions. If you ride varied spots, think in pairs:
Small-wave or freestyle board for lighter wind and fun sessions.
Dedicated wave board for windy or clean surf days.
Once you’ve got those two, you’re ready for 90% of what kiting throws at you.
Before you grab your board
If twintips are the gateway to kiting, directionals are the graduation. They’re not just surfboards with straps, they’re tuned machines built for the pull, the power, and the glide that only a kite can create. Whether you’re chasing glassy waves or just want to look a little more soulful out there, understanding what’s under your feet changes everything.
So take the time to find your fit. Choose a shape that matches your home conditions, your style, and your patience for crashes. A directional isn’t just another piece of gear; it’s your partner in flow. Once you click with it, you’ll wonder why you ever rode anything else.
And if anyone asks what kind of board you’re on, just smile and say, “The one that finally makes sense.”
xox Berito