
Wind, waves and timing magic
You know that feeling when you drive to the beach full of stoke, pump your kite like a motivated hamster, then realize the wind is… technically there, but emotionally unavailable? Yeah. That’s not “bad luck”, that’s planning with vibes instead of information. Let’s fix that.
Kitesurfing is the only sport where you can do everything right, and still get humbled by a tide swing, a sneaky current, or a swell direction that turns your “wave day” into a closeout wall of sadness. The good news is, you can stack the odds in your favor. Not perfectly, because the ocean does not care. But enough to score more good sessions and fewer pointless cardio road trips.
Wind first, but not just speed
Most kiters plan by staring at a single number, like 22 knots is a holy blessing and 14 knots is a personal attack. Real planning starts with wind quality, then wind strength.
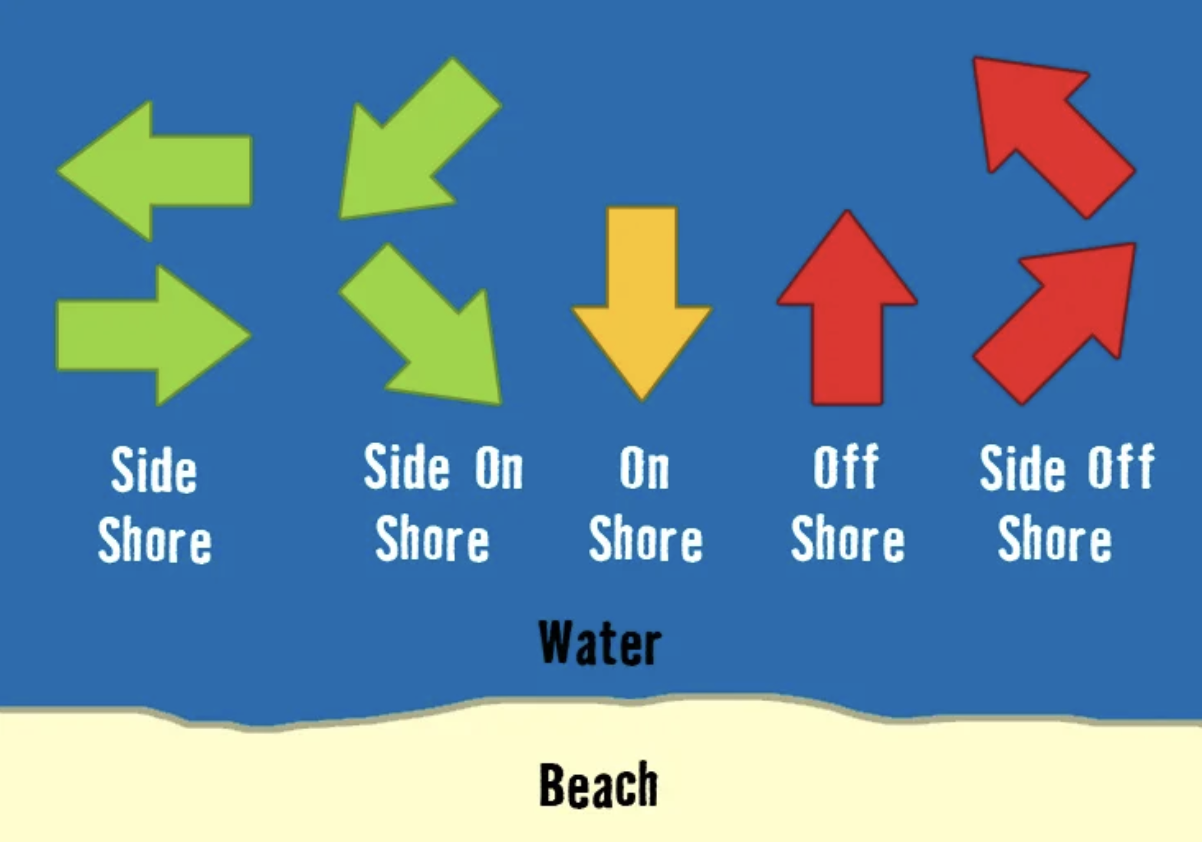
Start with the wind direction for your spot. Ask yourself two boring but life saving questions:
Is it safe, or is it offshore sketch? Side on is usually your friend, side off can be spicy, straight offshore is how people become tiny dots on the horizon. If you need a reminder, read Offshore wind: sketchy or sendy?
Does your spot actually work in that direction? Some beaches need cross shore to shape clean waves. Some need slight onshore to make the kickers behave. Some spots just turn into washing machine mode when the wind rotates five degrees.
Then check the gusts. A forecast that says 20 knots with gusts to 30 is not “extra fun”, it’s “extra emergency relaunch practice”. A smaller gust spread usually means smoother riding, cleaner wave faces, and fewer surprise slaps from your kite.
Also, look at timing. Many spots have a pattern, morning is light, afternoon thermal kicks, evening dies. If you want the deeper wind nerd version, your own Berito post Understanding sea breezes, trade winds and thermals is the rabbit hole. It’s listed in your overview, and it fits this topic perfectly.
Swell is not waves, sorry
A swell forecast shows energy moving through the ocean. Your beach turns that energy into actual waves, or into a foamy mess, depending on angles and seabed.
Here’s what to check:
Swell height, the obvious one. Bigger is not always better, especially if your wind is onshore and your spot is a beach break.
Period, the underrated one. Longer period usually means more powerful, more organized waves. Short period often means mushy bumps that feel like riding soggy pillows.
Swell direction, the deal breaker. If the swell is straight onshore at a beach break, congrats, you may get closeouts.
If you want a simple mental model for wave quality, your Berito post on wave types is gold. It breaks down why some days peel and some days dump. Understanding waves: Closeouts, peeling waves, and everything in between
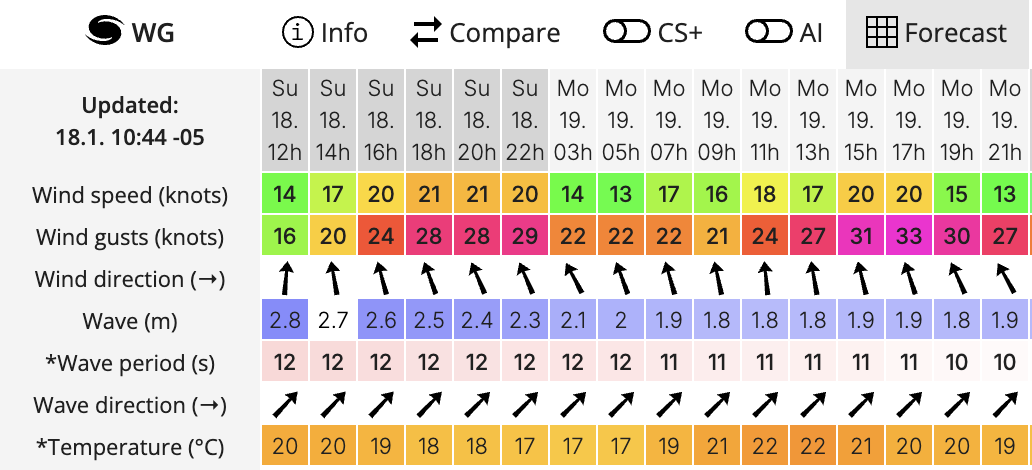
A quick example: You see 1.5 m at 11 seconds from the northwest. Your spot is a beach that faces north. Wind is cross shore at 18 knots. That can be dreamy, peeling sections, space to carve, and enough wind to keep your kite happy. Now rotate the swell to straight north and add more onshore wind, and suddenly it’s closeout city, population your kneecaps.
Tide timing is the session cheat code
Tide changes depth, current strength, and wave shape. Same wind, same swell, totally different session.
Most spots have a “works best at” range:
Low tide might expose sandbanks that create punchy peaks, or it might turn the whole area into shallow chaos with shorebreak traps.
High tide might clean up the waves, or it might drown the sandbar and make it fat and slow.
Mid tide is often the sweet spot because it balances shape and safety.
Also, high tide currents are directed to the beach where low tide currents are going away from the beach. This can make going upwind or riding comfortably easy or tricky.
Practical move: Plan your arrival around the tide window, not around your motivation. If your spot is best two hours around mid tide, aim to be rigged and on the water during that window, not parking your scooter while it’s happening.
Currents, the invisible treadmill
Current can make you feel like a hero, or like you forgot how to stay upwind overnight. It affects safety too. Strong current plus offshore or side offshore wind is a spicy combo, because drifting becomes faster than you think.
Current basics for planning:
Wind against current makes waves steeper and more chaotic. Sometimes fun, often exhausting. But this situation gives you a better upwind boost.
Wind with current can flatten the surface, sometimes making it cleaner and faster. But it can help you drift downwind even faster.
Around inlets, river mouths, and headlands, current can be much stronger than the forecast suggests.

If you want a clean explanation plus why it matters for board recovery and downwind drift, link this one: How currents can affect your kitesurfing session.
Use tools like a semi responsible adult
You don’t need twelve apps. You need a small routine that checks forecast, reality, and danger.
Here’s a simple flow you can copy every time:
Pick your spot based on direction: If wind direction is wrong for your local, stop romanticizing it. Choose a different beach or accept defeat.
Check multiple models: Windy and Windguru often disagree. That’s normal. Don’t choose the one you like most, choose the one that matches what you see outside.
Check radar right before you leave: Radar is the difference between a clean session and getting nuked by a squall line.
Sanity check with eyes: Before you rig, watch the water for 5 minutes. Are people staying upwind or doing the downwind walk of shame? Are waves actually peeling, or is it dumping? Are whitecaps consistent or patchy?
Common mistakes that ruin sessions:
Planning for max wind. If you always chase the strongest wind, you will also chase the most chaos. For progression, comfort and safety, pick a wind range where you feel in control. Being a little underpowered is often better for technique, especially if you are improving transitions, wave riding, or new tricks.
Ignoring gust spread. A “good average” with violent gusts is how you get surprise yanks, sketchy landings, and that one kite guy screaming “it’s fine” while his kite is doing interpretive dance.
Forgetting tide affects launch. Some beaches disappear at high tide. Some become shorebreak traps at low tide. Planning is not only about riding, it is also about getting in and out without drama.
Picking gear before you pick conditions. If you choose your kite size before you check gusts, direction, and current, you’re basically dressing for a party you have not been invited to.
Gear tips that actually help planning
You don’t need a new quiver. You need a few smart options and a system.
Kite choice: Match your kite type to your plan. A freeride kite is your safe default. A wave kite drifts better and handles depower nicely when you are carving. A big air kite might not be your best friend in gusty, current heavy wave conditions.
Board choice: Twintip in choppy, gusty, random days is forgiving and fun. Directional in proper waves is magic, but it punishes sloppy timing and bad wave selection. Foil is the light wind cheat code, especially when the swell is tiny and you just want to glide like a smug wizard.
Quick gear checklist before you commit: You do not want to drive an hour for a session, then realize your safety is jammed or your lines are a spaghetti art project. If you want a complete list, your Berito beginner checklist is a good reminder even for experienced kiters, because everyone forgets something eventually.
Putting it together, a sample plan
Let’s do a full fake session plan, because examples make your brain stop panicking.
Goal: A wave session with decent wind, clean faces, minimal current drama.
Choose the time window. You see mid tide is at 15:30. Your spot works best from mid to high tide. So you plan to be on the water from 14:30 to 17:30.
Check wind. Forecast shows 18 to 22 knots cross shore, gusts to 25. That is manageable. Direction is safe. Not offshore. Good.
Check swell. Swell is 1.2 m at 10 seconds, coming at a slight angle to the beach. That can peel.
Check current. Tide is flooding, current pushes slightly up the coast. That is fine, you will feel like you are magically staying upwind.
Pick gear. You choose the kite size that fits the middle of the range, not the top. You bring one size smaller as backup because gusts exist. You ride directional if you are confident. If you want less commitment, twintip with some playful kickers.
Do the reality check at the beach. Waves are peeling, riders are holding ground, and nobody is getting dragged downwind screaming. You rig. You ride. You feel like a planning genius, which is rare in kitesurfing.
Go forth and chase it
Planning your next session is basically building a little puzzle where wind, swell, tide, and current all have to match, and the ocean still gets the final vote. But if you use a routine, check direction and safety first, line up tide windows, and stop trusting a single wind number like it’s gospel, you will score more quality sessions.
And when you do get skunked anyway, congratulations, you just unlocked the most authentic kitesurf experience possible.
Because nothing says “I’m a kiter” like driving to the beach, opening Windy again, and pretending you meant to do a sunset walk all along.
xox Berito