
Get the wind on your side
Forecasting for humans, not meteorologists. Kitesurfers obsess over wind , and for good reason. Wind is the invisible engine that powers every session, yet many riders only check an app and hope for the best. This guide will take you from simply chasing numbers on a screen to truly understanding the breeze, the sky, and the water like a seasoned local.
1. The invisible Engine
What is wind, really? In simple terms, wind is air in motion, the atmosphere’s way of balancing itself out. It all starts with differences in temperature and pressure. Warm air rises (creating low pressure) and cool air sinks (creating high pressure). Nature hates an imbalance, so air flows from high-pressure areas toward low-pressure areas, and that movement of air is wind. The bigger the pressure difference, the stronger the wind blows.
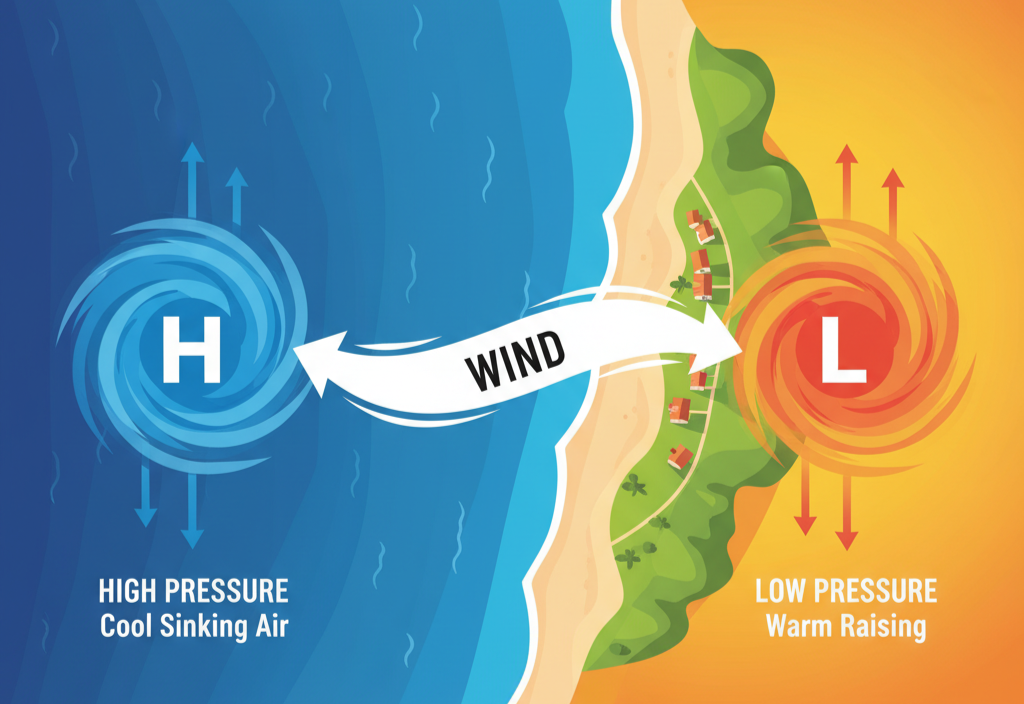
Consider a sunny beach day: the land heats up faster than the water. Hot air over the land expands and rises and creates a low pressure system, while cooler air over the sea in it’s high pressure rushes in underneath. Voilà, a breeze blows inland. Temperature differences lead to pressure differences, which in turn create wind. No magic, just physics.
But of course, the Earth doesn’t make it too simple. Our planet’s rotation throws in a twist known as the Coriolis effect. Instead of flowing straight from high pressure to low pressure, winds curve. In the Northern Hemisphere they veer to the right, and in the Southern Hemisphere to the left. This is why large-scale winds, like trade winds or storm systems, tend to swirl. Ever notice how storms spin counterclockwise north of the equator? That’s Coriolis doing its thing.

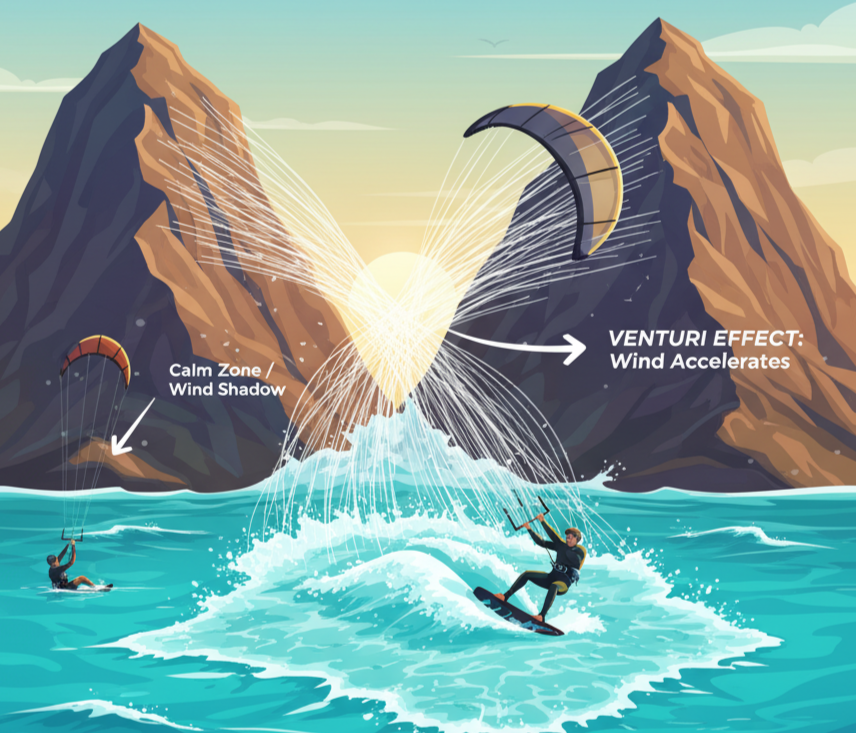
Every kitesurf spot is also shaped by local geography. No two beaches behave exactly the same in a given wind. Mountains, cliffs, buildings, and bays can all turbocharge or kill the wind in sneaky ways. For example, a high cliff upwind might block the lower winds and create a calm wind shadow near shore, your kite suddenly falls out of the sky as you launch. Dense trees or buildings upwind can make the wind gusty and turbulent, as if your kite is passing through invisible “air potholes.” On the other hand, certain terrains funnel and amplify wind: think of Tarifa’s venturi effect through the Strait of Gibraltar or Cape Town’s “Cape Doctor” accelerating between mountains.
High vs. low pressure: On weather maps you’ll see big H and L marks. High-pressure systems usually bring sinking air, clear skies, and lighter, more stable winds. Low-pressure systems involve rising air, clouds, and often stronger, gustier winds. As a rule of thumb, standard sea-level pressure is 1013 hPa. Above that is high-pressure, below that is low-pressure. Kitesurfers who learn to read pressure maps can predict windy days days in advance. Tight clustering of isobars means a steep pressure gradient and strong winds on the way. If you’re seeing widely spaced isobars, don’t be surprised by a light wind day.

2. Meet your wind types
Not all wind is created equal. In fact, there are different breeds of wind that kiters encounter, some global, some local. Knowing which type you’re dealing with helps you set your expectations (and kite size) for the day.
Trade winds: The global superstars of wind, steady, reliable winds that blow in fixed bands near the equator. Trade winds blow from east to west and are famously consistent. They’re powered by warm air rising at the equator and cooler air sinking in the subtropics, driving a constant circulation. Kitesurfing paradises like the Caribbean, Hawaii, or Brazil’s Jericoacoara owe their sweet, dependable winds to the trades.
Sea breezes: The daily winds that many coastal kiters live for. As described earlier, during a sunny day the land heats up faster than the water, drawing in cooler air from the ocean, that’s a sea breeze. By late morning or midday, you’ll feel a nice onshore breeze picking up. Sea breezes are usually side-onshore or onshore and are pretty steady and smooth because they’re driven by gentle thermals rather than stormy turbulence. Often, a sea breeze can boost the base wind: if a light wind was already blowing, the sea breeze can amplify it, sometimes making the wind 1.5 to 2 times stronger than forecast in the afternoon.
Land breezes: The lesser-known cousin of the sea breeze, a land breeze blows off the land toward the water, usually at night. After sunset, the land cools down faster than the sea, so now the land air is cooler (high pressure) and the ocean air is relatively warmer (low pressure). The result is a gentle offshore wind. Land breezes tend to be light, fickle, and happen in the late night or early dawn hours. They’re usually much weaker than sea breezes and not something kitesurfers typically rely on.
Thermal winds: The local winds caused by temperature differences in specific terrains, not necessarily just land vs. sea. For example, desert areas or regions with big temperature swings between day and night can develop strong thermic winds. Mountains and valleys can also create thermals, where a valley heats up and draws in air, creating a wind that isn’t forecast on the large-scale map. A famous example is the thermal winds in parts of Egypt’s Red Sea. On a hot day in the desert, the air near the ground rises fast and cooler air rushes to replace it, yielding a predictable afternoon wind. Thermal winds can make unlikely places kiteable. If you’re kiting in a spot known for thermal winds, expect peak wind in late afternoon and usually dying off by evening once the heating calms down.
Trade’s siblings (monsoons & seasonal winds): In some parts of the world, seasonal wind patterns dominate. Monsoons are giant seasonal sea/land breezes on a continental scale, bringing consistent winds, and weather changes, for months at a time. While monsoon often means rain, kitesurfers in regions like Southeast Asia know monsoon seasons as distinct wind periods too. Always good to know if your destination has a named seasonal wind and these local winds have personalities.
What about the quality of these winds? Beyond direction and cause, winds can feel different depending on the climate. Warm tropical air is less dense, so a 20-knot tropical wind doesn’t pull as hard as a 20-knot cold wind in Northern Europe. Humidity plays a role too , humid air is actually lighter (less dense) than dry air. The result: light, warm, humid winds feel softer, you might need a bigger kite than the raw wind speed suggests. Conversely, cold, dry winds pack a punch, you can often ride a size smaller kite in winter conditions because the air is dense and grabbier. For example, 20 knots in muggy Brazil might ride like 18 knots, whereas 20 knots in crisp Cape Town air might feel like 22+ knots of power. High altitude spots similarly have thinner air, if you ever kite at a high mountain lake, remember the air density is lower, so you lose some power.

The key takeaway: wind speed is only a number, how that wind feels depends on the type of wind and the air’s density. The savvy kiter notes the context: Is this wind thermal or frontal? Is the air cold-dense or warm-thin? Is there moisture? All those clues help you pick the right kite and anticipate whether the wind will be steady or full of surprises.
To visualize many of these wind types in real time, fire up a global wind map like Windy. You can see the sweeping trade winds streaming across the tropics, or zoom into your local coastline at 2 PM to spot that sea breeze curling in. It’s a great way to connect the theory with what’s happening outside. Play with different layers like wind at surface vs. higher up, temperature maps, to see the engines driving your wind. The more you watch these patterns, the more you’ll anticipate the wind before you even step outside.
3. The direction dilemma
Wind direction can make or break your session, it determines whether you’ll be blown out to sea, dragged onto the beach, or cruising comfortably along the shore. Not all wind directions are equal, especially when it comes to safety and ride quality.

Onshore wind is blowing from the sea toward the shore. This means the wind is coming straight in from the water, hitting the beach head-on. Onshore wind is a mixed bag for kiters. On the plus side, if anything goes wrong, it will push you back toward the beach. However, direct onshore like exact 90° into the beach, can be tricky: launching and landing require extra care because the wind will want to pull you inland immediately. An onshore wind can also make the water state messy, it pushes waves over faster, often causing them to break earlier and in a more disorganised way. If you do go out in onshore wind, you need to be confident riding upwind to avoid being continually shoved into the beach break. It’s doable but pure onshore is usually handled by intermediate or above riders who can get out past any shore break quickly.
Offshore wind is blowing from land out to sea. This is the reverse, wind is going from the beach toward the open water. For surfers, offshore wind is glorious because it holds up wave faces, making smooth barrels, but for kitesurfers it’s generally dangerous unless you have special safety backup. Why? An offshore wind will carry you away from land. If something goes wrong, say your kite fails or you have to self-rescue, you’ll be drifting further out, a nightmare scenario without a rescue boat. Offshore winds are also typically gusty and turbulent near the shore, because the wind has traveled over land with trees, buildings, hills causing uneven flow, and there may be a wind shadow right at the water’s edge. In short, offshore winds are sketchy for kiting, proceed only if you’re experienced, the wind is very stable, and you have a clear backup plan.
Side-shore wind is blowing parallel to the shore. This is often the ideal wind direction for kitesurfing. Why? Because it doesn’t shove you toward land or out to sea; instead, you can ride along the shore comfortably. If you drop your kite, you won’t get dragged immediately into the beach and you won’t drift out forever, you’ll tend to drift downwind along the beach. Side-shore winds also tend to be cleaner, less turbulent, if they’ve blown over water to reach you. Many iconic kite spots work best in a side-shore wind. You still need to know how to stay upwind, or you’ll do the walk of shame down the beach after drifting, but overall it’s a rider’s favourite. In side-shore, the waves are better shaped than onshore, wind blowing across a wave can groom it slightly, and you can ride the waves without the wind pushing you off the face.
Side-onshore wind: This is a hybrid of the above, wind coming at you from an angle, roughly 45° onshore. Side-onshore is often considered the safest and most user-friendly direction. It has enough onshore component to push you back to the beach if you have an issue, so you won’t end up in deep sea, but it’s angled enough that you can still ride along the shore easily without constantly fighting a direct onshore push. Most beginners are advised to start in side-onshore winds. These winds are usually stable and smooth. If you lose your board, the wind and waves will likely bring it toward shore rather than carry it away.
Side-offshore winds: Conversely, this is a wind blowing at an angle off the land, maybe 45° off your shoulder out to sea. It’s more risky than side-shore, since it has a component that can pull you out if you get in trouble. If the angle is slight, experienced kiters can manage it, but the more offshore it is, the more you edge into dangerous territory. Side-off winds often suffer from turbulence from the land as well.
On a beach, the best winds are usually somewhere between side-onshore and side-shore. Direct onshore or any degree of offshore raise red flags. When you arrive at a spot, figure out where the wind is coming from relative to the coastline. A quick trick is to stand with your back to where the wind hits you, and you’ll be roughly pointing toward where the wind is going. Or use local landmarks like flags, smoke, or whitecaps to indicate how the wind is blowing.
If you’re unsure about a wind direction at a new spot, ask a local or an instructor. Locals know the quirks: maybe a certain direction causes a nasty wind shadow behind a headland, etc. And remember that wind direction can also affect wave conditions: onshore winds make for choppy surf and offshore winds groom the waves.
4. Cloud clues and sky signs
Believe it or not, the sky has its own secret language, and if you learn to read it, you can catch hints about the wind and weather hours before your app updates. Clouds are like nature’s billboards, advertising what’s brewing in the atmosphere.
Basic cloud types and what they mean for kiters:
Cumulus: These are your fair-weather cotton balls. Small, puffy cumulus clouds, think cartoon clouds, usually indicate fair, warming conditions and often pop up late morning or midday. Kiting significance? If you see little cumulus popping up over land on a sunny day, it can mean a sea breeze is kicking in. Generally, fair-weather cumulus means a breasy afternoon.
Stratus: A low, gray, featureless layer, the overcast blanket that just covers the whole sky. Stratus clouds usually mean stable, stagnant conditions. Often no sun breaks through, temperatures don’t vary much, and wind can be on the lighter. It’s like a big “nothing to see here” sign in the sky. Stratus is steady but possibly low winds. If there is wind, it might be consistent but mild.
Cirrus: These are the high, wispy streaks way up at 30,000 feet. Cirrus clouds are made of ice crystals and often precede changes in weather. “Mares’ tails and mackerel scales make tall ships carry low sails” goes the old saying. Translation: cirrus clouds often signal that a new weather system is about 12-24 hours away. If you see wispy streaks of cirrus increasing in the sky, a kite-weather-change is likely coming, maybe a wind direction shift, or a front bringing stronger winds or rain. Scattered high cirrus by themselves don’t affect your current session, you can kite under a blue sky with some cirrus just fine. But if by afternoon the sky goes from clear to milky with lots of high streaks, you might expect tomorrow’s conditions to be different.
Cumulonimbus: The king of clouds, aka the thunderstorm cloud. These start often as cumulus that kept growing… and growing… into huge cauliflower towers with dark bases, often spreading out into an anvil shape at the top. A cumulonimbus cloud means business: thunderstorms, squalls, heavy rain, lightning, you name it. If you see one of these anvil-shaped monsters approaching or forming nearby, it’s definitely time to put kiting on pause and assess. These clouds can generate dangerous gusts that can go from 15 knots to 40+ knots in minutes, and chaotic winds that can come from different directions as the storm cell moves.

Now, beyond just identifying cloud types, pay attention to changes in the sky and other signs:
Towering cumulus growth: If those small cumulus clouds start building into big towers late in the day, instability is brewing. It often means the atmosphere is convectively active, could be the start of thunderstorms or just strong thermal mixing that might cause gusty conditions. As a kiter, if around mid-afternoon you notice the clouds getting much taller and darker, be on alert. Within a couple of hours, you might get squalls or at least very gusty winds. Time to monitor radar or be ready to land.
Lowering cloud base: Is the cloud ceiling getting lower and more solid? For instance, do distant clouds that were fluffy now look like they’re merging into a gray mass? A lowering cloud base often means pressure is dropping, approaching low or front, and moisture is increasing, likely heralding rain or a storm front soon. If the day started with high clouds and now even the lower clouds are filling in, the weather is probably taking a turn for the worse, wind could spike or shift with it.
Color and light changes: The classic greenish tinge to clouds can precede hail storms. If you ever see an eerie green storm cloud, get off the water! A more common one is if the sky goes dark and you see a haze or curtain under the clouds in the distance, that’s rain falling. If it’s upwind of you, expect a gust front soon. Also, a sudden temperature drop or a blast of cool wind out of nowhere on a hot day is a huge red flag, it often means a storm’s outflow just hit you or is about to hit. Riders often report “the temperature suddenly dropped and the wind went from steady to insane” just before a squall, that’s a cumulonimbus outflow rushing out ahead of the rain.
Bird behaviour: Even the birds can tip you off. Ever notice how seagulls start flying low over the water, or suddenly all take refuge on land, before a storm? They sense pressure changes and wind shifts. If birds that were soaring happily suddenly disappear or start battling the wind low, something’s up. For example, birds flying low to the ground or hunkering down often indicates a storm or very gusty weather incoming. It might sound a bit mystical, but in practice it’s true: animals are tuned into weather shifts, trust the birds more than the forecast if you notice unusual behaviour.
Let’s put together a storm-spotter checklist for quick reference. These are sky signs you shouldn’t ignore when kitesurfing:
Anvil or mushroom-shaped cloud: Big thunderstorm cell visible, so do not launch. That’s likely a cumulonimbus bringing strong gusts and lightning. Time to land your kite if you’re out, or stay ashore.
Sudden temperature drop: Feel a chilly breeze hit when it was warm? That’s often the outflow of a storm. Danger, winds will spike and shift. Get ready to depower or land immediately.
Rapid wind shifts: If the wind is swinging direction or going from zero to hero in seconds repeatedly, a storm may be brewing or nearby. Steady trade winds don’t usually do that; unstable storm winds do. Caution.
Distant thunder: If you can hear thunder, the storm is close enough to be a threat, lightning can strike from storms miles away. Follow the 30/30 rule: if thunder follows lightning in less than 30 seconds, storm is within 10 km, get out of the water, and wait at least 30 minutes after the last thunder before considering going back.
Dark, ominous water or sky in one direction: Sometimes you’ll see a line of dark cloud or a curtain of rain approaching. Or the water upwind turns dark, nearly black-blue under a cloud. That often means heavy rain or squall wind is hitting the water there, rain darkens the water surface. If that line is coming toward you, assume strong wind and rain will arrive soon.
Birds fleeing: As mentioned, if seabirds all vanish from the water or fly inland all of a sudden, they might be avoiding a coming squall. Similarly, if you notice beach flags suddenly fluttering opposite, outflow wind, then dying, then flipping back, it’s a storm puff passing. All signals to be on high alert.
Cloud stacking: Sometimes you see multiple layers of clouds moving different directions, e.g., low clouds going west, high clouds going east. That wind shear can indicate instability and an incoming system. While not as obvious, it’s worth noting if you’re geeky: different directions aloft can mean turbulence and storms forming.
One fantastic resource for cloud lovers is the Cloud Appreciation Society, they catalog cloud types and photos. Spending a little time browsing their cloud images can train your eyes to recognize altostratus vs. nimbostratus. But for kiting purposes, focus on the major signals above.
5. Forecasts and reality
Ah, forecasts, our beloved wind apps and websites. We check them more often than Instagram, praying for those colored wind bars to turn green or yellow, or red, if you’re an adrenaline junkie. But as you’ve likely learned, forecasts are not guarantees.
How forecast models work: Think of a forecast model as a huge calculator that divides the atmosphere into a 3D grid and solves physics equations at each point, temperature, pressure, wind, etc., moving forward in time. Different models (GFS, ECMWF, ICON…) have different resolutions and algorithms. In plain: a model is an educated guess. So don’t treat a forecast as gospel, treat it as one piece of the puzzle.
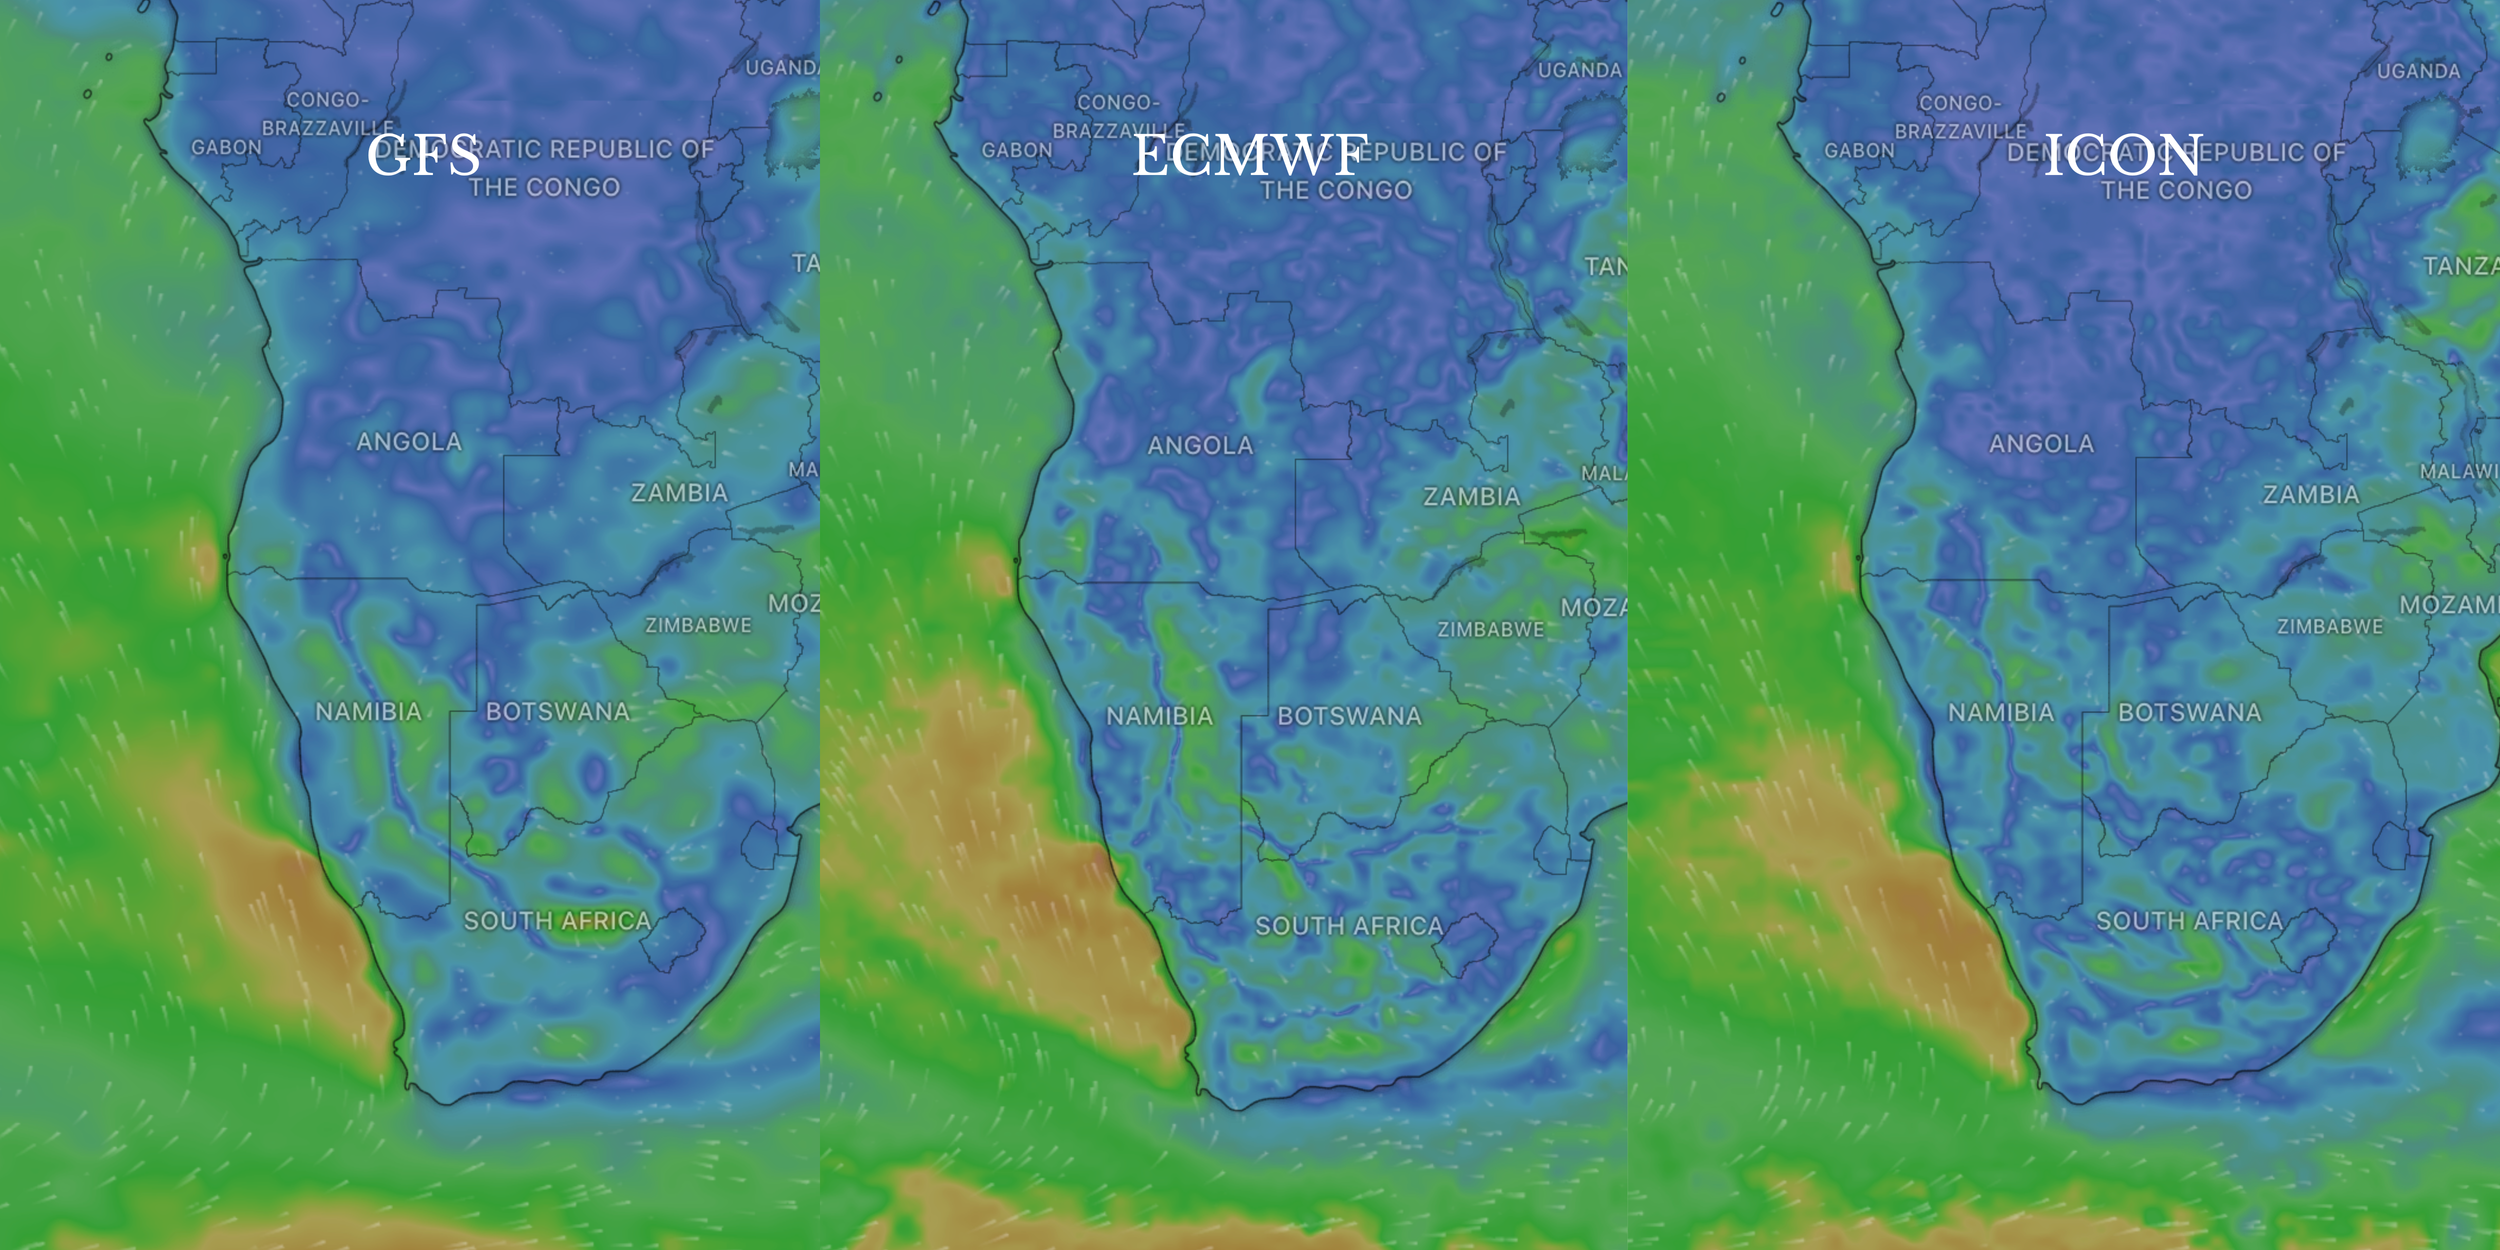
Global vs local models: Global models, like GFS, ECMWF, cover the whole world with moderate resolution. Local models like WRF, HRRR, AROME, often have finer resolution in specific regions, catching smaller-scale features. Windguru, for example, might offer multiple model outputs for a spot, a coarse one and a fine one. It’s wise to compare them. If all models agree on say 20 knots, chances are good. If one says 20 and another says 12, uncertainty is high, plan accordingly (maybe take a range of kite sizes).
Which apps to trust: There are dozens of wind forecast apps/sites: Windy, Windguru, Windfinder, iKitesurf, WindAlert, local met office sites, etc. Each has their loyal fans. Honestly, no single app is 100% right; the magic is in using a combination. Windy is fantastic for visualisation. Windguru is a staple for many kite spots, providing easy-to-read tables. Windfinder gives a quick outlook with an emphasis on user-friendly spot info and often has a superforecast. iKitesurf/WindAlert are popular especially in North America for very localised readings and real-time sensors. Our advice is to pick two or three sources and always compare. If they all line up, confidence is high.
Check Windguru’s table for your spot (it might show something like 16 knots at 3pm with gusts to 20, direction WSW), then check Windy (maybe the map shows a patch of stronger wind slightly offshore). Does Windy’s timeline for that spot match? By looking at a couple, you might notice, say, the European model expects a bit more wind than the US model. That tells you there’s some disagreement, maybe a marginal day. In such cases, plan for lower and hope for higher.
Don’t forget the gusts: Many forecasts show an average wind and a gust value. Pay attention to that spread. A forecast of 15 knots gusting 30 is a red flag, that indicates very gusty conditions. If you see big gust factors, prepare for a rodeo on the water. Conversely, 15 gusting 17, suggests nice steady wind. So the gust number often matters as much as the mean.
Local wind effects in forecasts: Some apps try to account for thermals or diurnal effects. Windfinder’s Superforecast might show a midday bump for sea breeze spots. But if you know your spot gets a thermal boost, mentally add a couple knots to afternoon predictions. And vice versa: if your spot is notorious for being shadowed in certain directions, don’t be surprised if the actual wind is less than forecast when it’s blowing from that direction.
Reading radar and real-time data: Forecasts predict the future, but what about right now? This is where weather radar and live observation come in. Radar isn’t just for rain, it’s a secret weapon for kiters to see squalls and wind shifts approaching in real time.
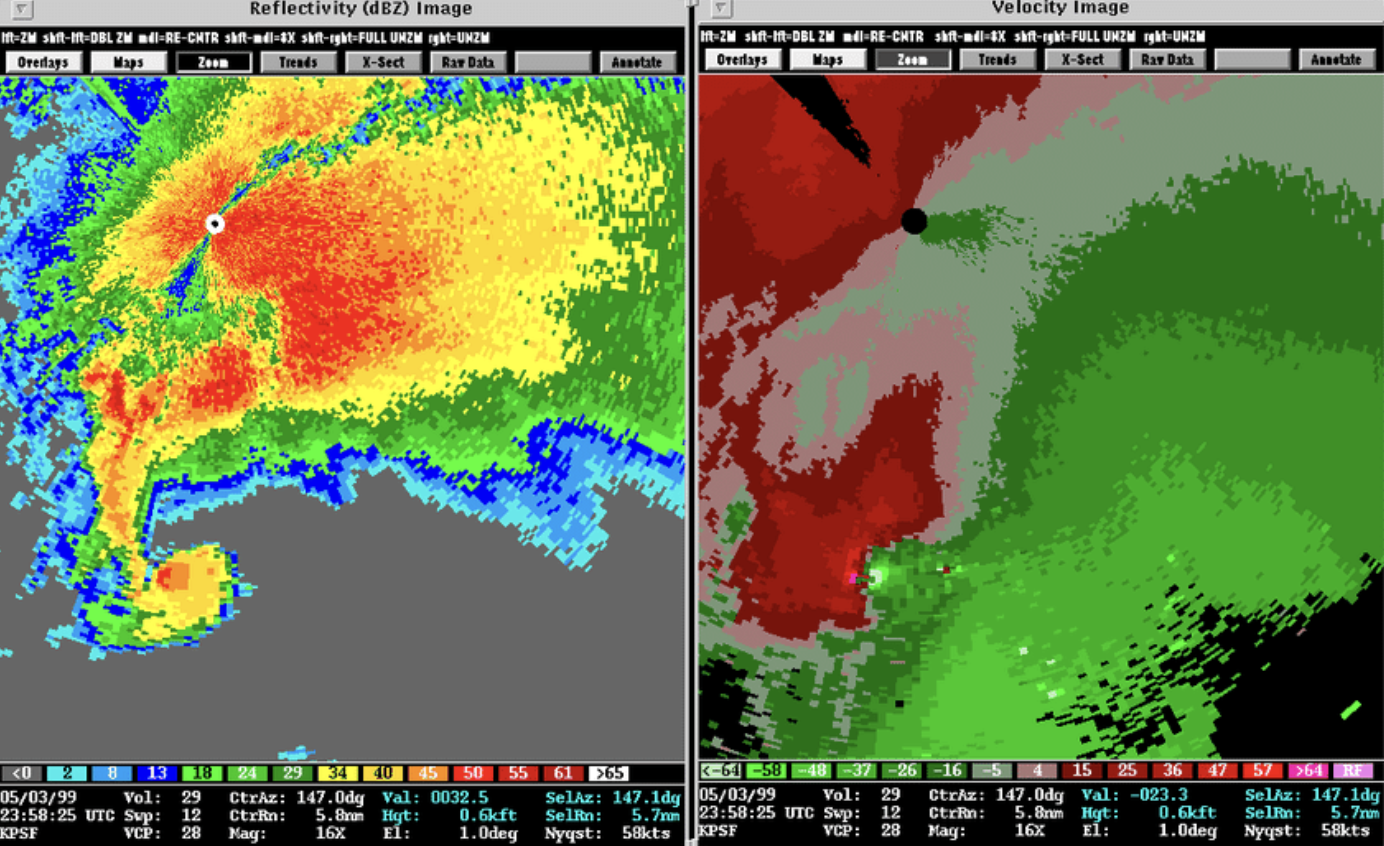
Reflectivity radar: This shows precipitation (rain) intensity. On most radar maps, green means light rain, yellow means moderate, red/purple means heavy rain or hail. Why do we care? Because rain often comes with wind changes, especially squalls. If you see a line of yellow/red blobs on radar moving toward your area, that’s likely a squall line or storm front. Such lines often bring abrupt wind shifts and a big spike in wind speed, plus heavy rain. A classic squall line on radar looks like a bow or line; if it’s upwind, you might have minutes before it hits with a 30-knot blast. Knowing that, you can land your kite before the chaos. On the other hand, radar can also confirm if a rain cloud is passing north of you so you won’t get hit. It’s real-time situational awareness.
Velocity radar: Some radar apps, like certain national weather services or Windy’s radar view, offer a Doppler velocity product, basically showing wind movement toward/away from the radar. It’s more advanced, but it can reveal rotating storms or just the wind flow inside rain. Typically, green/blue colours mean wind moving toward the radar, red means wind moving away. If you see a lot of vivid colours tightly packed or changing rapidly on a velocity scan, that implies strong winds or shear. Kiting takeaway: not many kiters use raw velocity data, but if you do, look for consistent smooth patterns (good) vs. chaotic, rapidly shifting patches (gusty/stormy).
RainViewer & satellite: A great external tool is RainViewer, which aggregates global radar. It’s handy if you travel or want a quick check of storm radar on your phone. Satellite imagery, visible or infrared, can also show big cloud masses if you want the big picture. Satellite won’t show you wind, but you can infer areas of instability.
Reality check: You show up expecting 18 knots as forecast, but it’s glassy, or vice versa. Here’s how to handle it:
Use a wind meter or flags: Old school but effective, look at flags, trees, whitecaps, or use a handheld anemometer at the beach. Compare it to what was forecast. If forecasts said 18 knots but flags are barely moving, something’s off, maybe the model missed cloud cover that killed the thermal. Trust what you see.
Check upstream observations: Wind often comes from upwind regions. If you know the wind typically comes from the west, check a reporting station or kite spot 50-100 km west. Are they showing the wind you expect? Many apps have live readings from airports or buoys. If upwind stations show the wind hasn’t filled in, it might be delayed or never arriving. Conversely, if upwind is nuking, and you’re calm, maybe it’s on the way.
Microclimate gotchas: Some days, a general forecast can be way off because of local microclimate. Example: a forecast might not realise a marine layer of cool air is hugging the coast, keeping wind low, even though just inland it’s windy. Understanding your spot’s microclimate helps interpret those surprises.
Combining tools for a winning plan:
Check a couple forecast models (Windguru/Windy).
Look at the pressure maps or synoptic charts, to see if a high or low is around.
Look at radar and satellite on the day of, to spot any unexpected rain cells or cloud cover.
Use local knowledge: “If it’s NW wind and sunny, our spot usually gets extra 5 knots at 3pm,” or “A passing morning rain could shut down the thermal today.”
Even look at tide and currents, an outgoing tide against the wind can create more chop and sometimes even a slight enhancement of wind on the surface, as water friction causes mixing.
Forecast vs reality example: Let’s say Windguru showed a tidy chart of 15-16 knots all afternoon. You arrive at noon, it’s 12 knots and cloudy. Reality is under-delivering. You check the sky and there are a lots of clouds, thermal killed. On the radar you see a sprinkle 30 km away, a dying rain cell. The pressure map shows a weak low is to the north, maybe not ideal for your spot. Now you know the model probably overestimated the sun and thermal. But you notice on Windy that by 3pm a front edge might pass, possibly clearing the clouds. Sure enough, at 3:30 the sun peeks out, wind bumps to 18 knots for an hour, then dies as evening comes. If you’d left at 1 out of frustration, you’d have missed that window. By combining observations, clouds, radar, with forecast hints, you caught the real wind.
6. Reading the water
You’ve checked the sky and your apps, but what is the water telling you about the wind? Believe it or not, the ocean or lake surface itself is an excellent immediate wind indicator. Being able to read the water can confirm conditions at a glance and alert you to changes coming down the pipe.
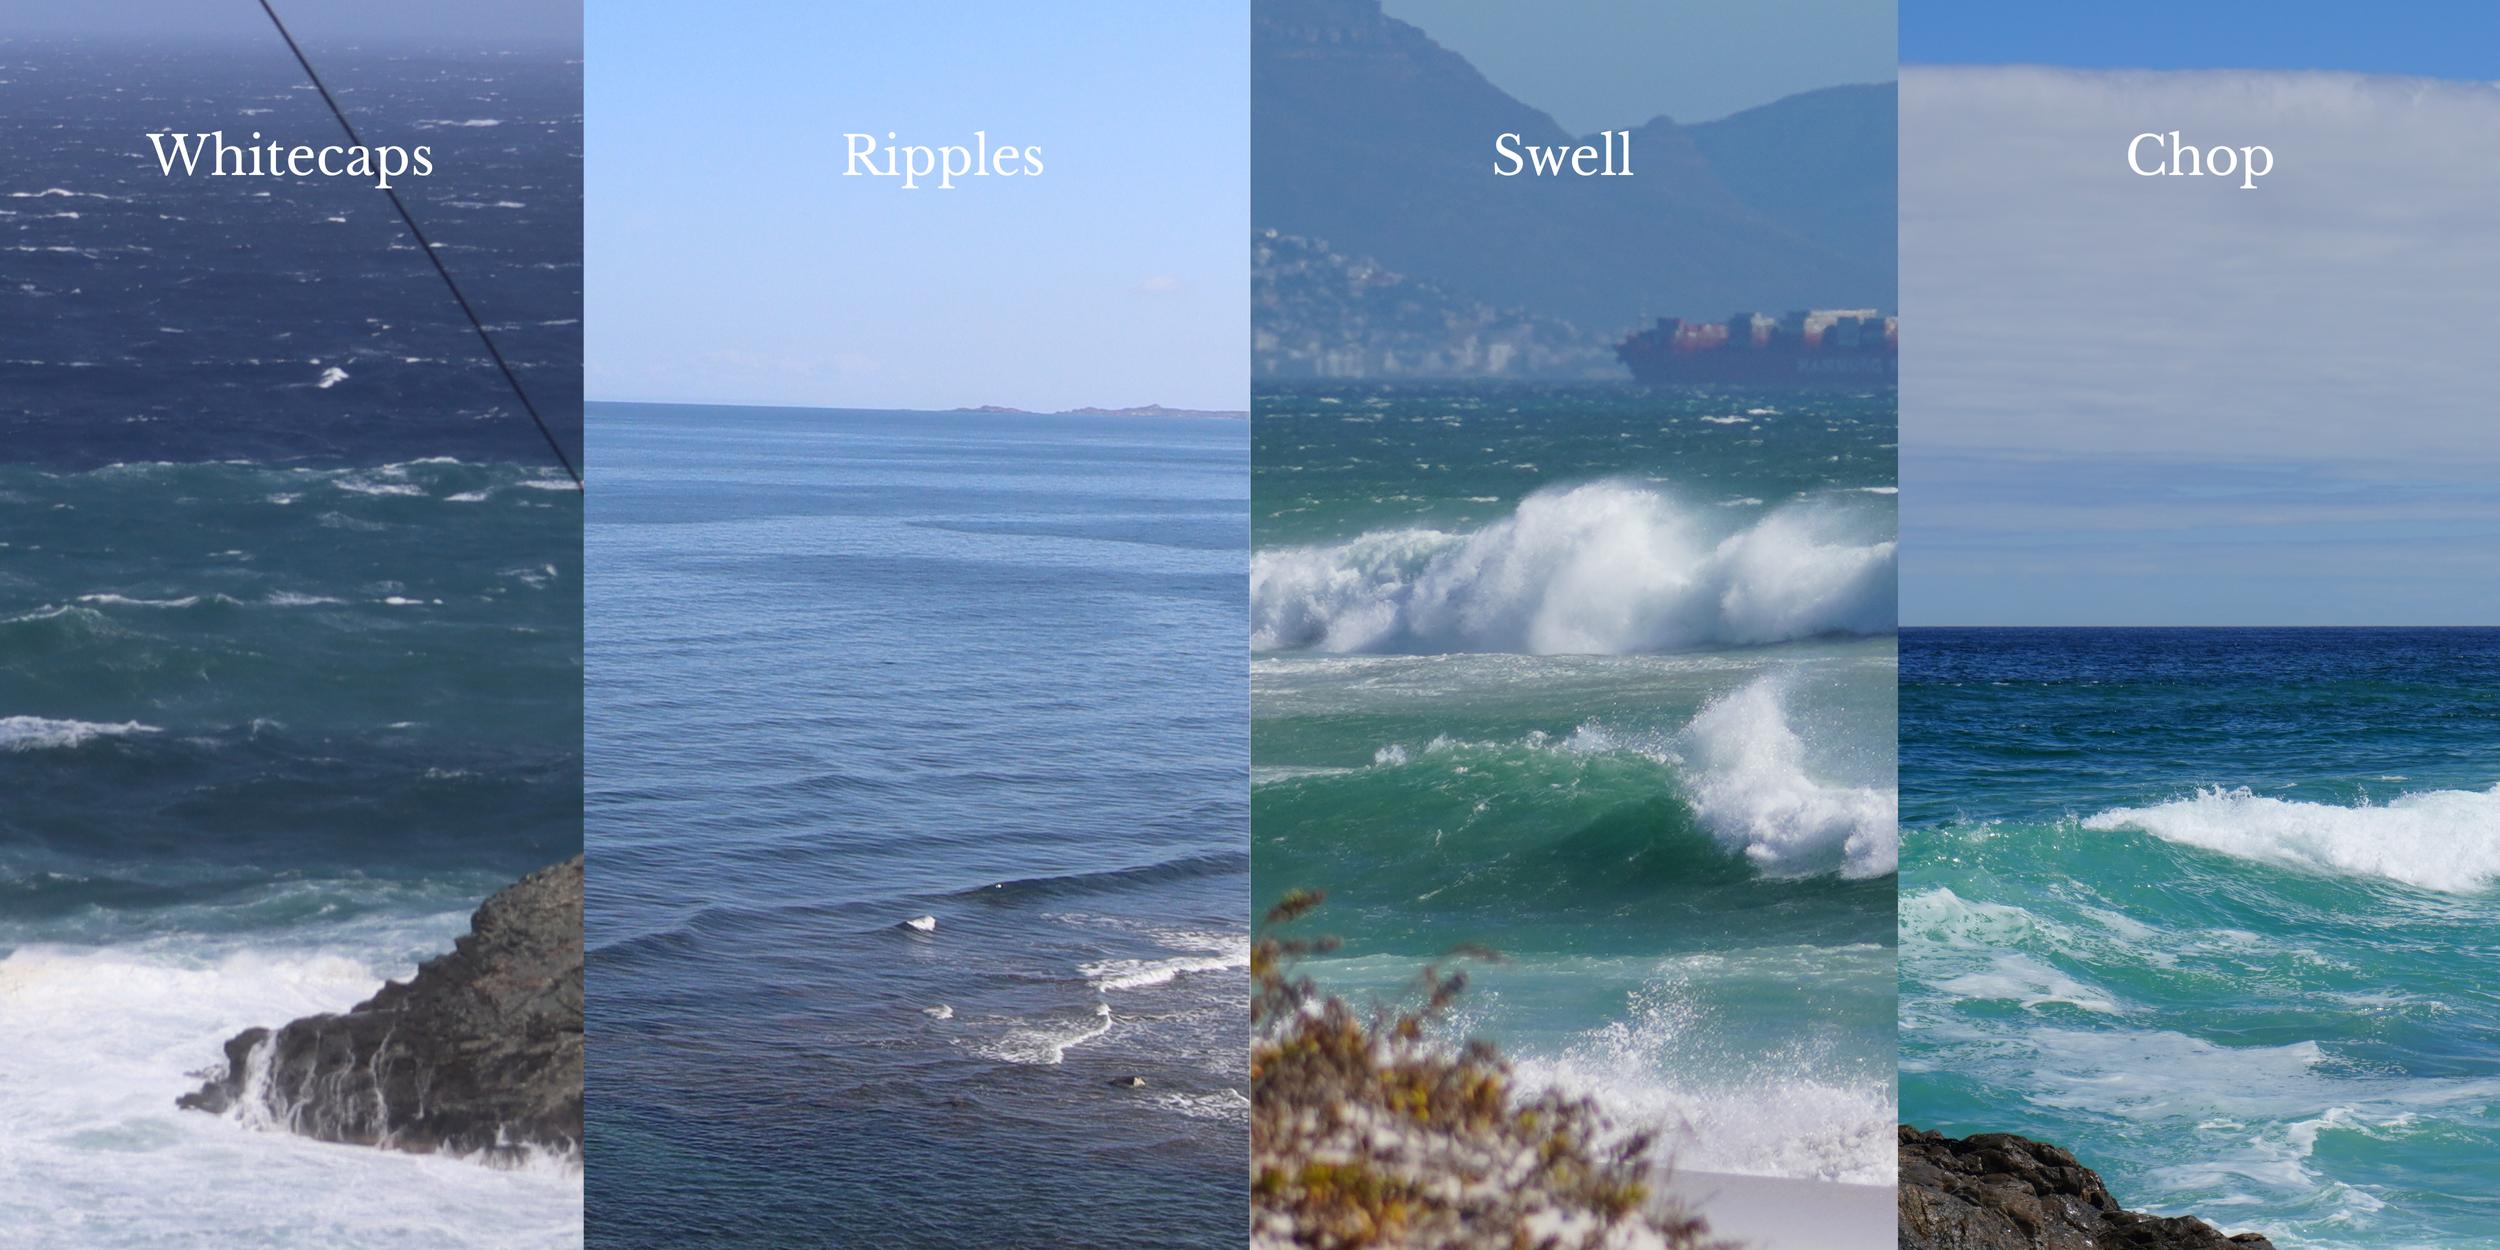
Whitecaps and ripples: The first thing most of us look for are whitecaps, those little white foamy crests on the waves. They are a classic sign of sufficient wind. Typically, whitecaps start to appear around 8–10 knots of wind, and become numerous by about 15 knots. If you see zero whitecaps, likely the wind is under 8 knots, or the water fetch is too short for them to form. Lots of whitecaps everywhere, white horses galloping, mean it’s blowing solidly, often 15+ knots for sure, and likely 20+. So simply observing the prevalence of whitecaps can give you a ballpark wind speed.
Besides whitecaps, look for ripples, these are patches of darker, textured water that move along the surface. In lighter winds, you won’t see full whitecaps yet, but you’ll see dark patches where the breeze touches down. Those ripples along the water are the footprint of gusts. If you see them approaching toward you, a gust of wind will hit in a few seconds.
Swell and chop clues: Look at the pattern of the waves or chop. Are the waves aligned nicely in one direction, or are they confused? Smooth, aligned waves usually indicate a steady wind blowing consistently from one direction for a while. If the water surface is super messy with waves coming from different directions, it could be that the wind shifted recently or is gusty and turbulent.
If there are longer-period swells, swell generated by distant storms, entering your spot, note their direction versus the wind direction. If the wind is opposite to the swell, the water will be extra lumped up. If wind is blowing same direction as a moving current or outgoing tide, it effectively sees higher relative wind over the water surface, kicking up steeper chop.
Flat water vs. texture: If you notice an area of unusually flat water amidst an otherwise breezy day, something could be up. Flat water can indicate a wind shadow or lull. For example, if near shore the water is glassy but farther out it’s choppy, likely a bluff or dune is lifting the wind off the surface near shore. Alternatively, if you see a long line of smooth water cutting across a breezy surface, it could be a temporary lull or wind shift line, maybe the wind direction changed slightly and canceled out waves along that line.
Reading currents: A strong current against the wind direction will make waves stand up taller and closer together, a small chop can become nasty if current opposes wind. If you’re at a river mouth or something, look at water movement. Sometimes you can see a rip current or outgoing tide line, with debris or different color water, where that meets incoming wind waves, it’ll be rougher. Knowing this can help you avoid gnarly chop zones or understand why part of the spot is harsher.
The spot-check ritual: Develop a habit of spending 2–3 minutes just watching the water before you commit to a kite size or even rigging at all. Here’s a quick checklist:
Look for whitecaps: Are they present? Scattered or everywhere? Tells you roughly how powered you’ll be.
Observe gust patterns: Do you see gust lines (darker ripples) moving on the water? How frequent and how fast? Tells you how gusty it is.
Check nearshore vs offshore water: Is it calm nearshore and windy offshore? Might be a wind shadow, be careful launching and get out further for consistent wind.
Align with others: If other kiters or windsurfers are out, see how they’re moving. Are they parked and barely planning, wind might be lighter than it looks? Are they lit and edging hard, it’s strong? What size kites are they on relative to their weight? This human intel is gold.
Flags and sand: On the beach, are flags flapping straight out or luffing? Are there any dust/sand blowing? Those give a sense of the wind right at ground level.
By combining these cues, you’ll form a pretty accurate picture of the wind before you even unpack your kite. Also, spot changes while you’re out: Keep scanning the water as you ride. If you see a dark line of gusts coming, you can prepare. If you see the water upwind going oddly calm, maybe a lull or shift is about to hit, be ready for kite to potentially fall. Reading water is a dynamic skill; the more you practice, the more second-nature it becomes.
One more fun observation: water color change at the surface can indicate wind differences. Calm water often appears glassy and lighter-colored because it reflects the sky; wind-ruffled water looks darker from afar. So you can literally see wind vs no-wind areas by color tone, many kiters scanning for wind at a distance use binoculars to spot these patches.
7. Knots, numbers, and kite sizes
Wind data often comes in knots, a unit sometimes confusing to newcomers. And matching those numbers to the right kite size is part art, part science. In this chapter, we’ll demystify wind speed units and give you practical guidelines for choosing the right kite size for the wind.
Knots vs. other units: A knot is a nautical mile per hour. 1 knot = 1.15 miles per hour ≈ 1.85 km/h. Many kitesurfers and sailors use knots because it’s tradition in maritime contexts. If your app shows wind in knots and you think in km/h, remember that:
10 knots ≈ 18.5 km/h
15 knots ≈ 28 km/h
20 knots ≈ 37 km/h
30 knots ≈ 55 km/h
Some countries or apps use km/h or m/s. Why does it matter? It’s key to not mix up units. If a spot says 20 (and it’s m/s), that’s a nuclear 39-knot wind, not a casual 20 knots! Many newbies have gotten a fright by mis-reading units, so double-check what unit your source is using.
What wind speed means on the water:

Now, choosing kite size: The right kite depends on wind, your weight, board and preference. Manufacturers provide wind range charts for each kite size, often assuming an average 75-80 kg rider on a twin-tip. Those charts are a starting point. If you’re lighter or heavier, adjust accordingly. Lighter riders can hold a given kite in slightly more wind, heavier riders might need a size larger for the same wind.

This is a guide, not gospel. Different kite models have different power. Also, board choice matters: a bigger board can handle lighter wind with a smaller kite, etc.
Another handy rule of thumb often cited: Weight in kg’s / Wind in knots * 2.2 = Kite size. This is a simplification, but for moderate winds it can ballpark you.
Gust range consideration: Remember those gust readings? If the wind is 18 knots with gusts of 25 knots, it’s wise to size your kite for the gusts, not the average. That might mean riding a 9m when you’d normally do 12m for 18 knots, because 25-knot gusts would hammer the 12m. Always better to be slightly underpowered than overpowered, especially in gusty conditions. You can sine the kite or ride a bigger board if underpowered, but if overpowered, you risk being lofted or losing control.
Kite size and air density: We mentioned climate, keep it in mind. If you travel: in a hot humid place, you might need one size up from your usual for the same wind. In cold dense air, you might hold one size smaller. For example, 20 knots in cool dry Cape Town might have you on a 9m, whereas 20 knots in tropical Brazil you might be happier on a 11m, because the air’s thinner.
Kite range and depower: Modern kites have a huge wind range. A 12m can often be held from 12 knots up to 20+ knots by an experienced rider with trim adjustments. But just because you can hold it doesn’t mean it’s optimal or safe at the top. When in doubt and the wind picks up, size down.
Kite size vs board and style: Freestylers who want power for big jumps might hold a bigger kite than a casual freerider who is fine cruising on a smaller kite. Waveriders often use one size smaller kite than twin-tip riders in same wind because they leverage the wave and want a lighter kite feel. Foilers use much smaller kites in light winds because of low drag. So adjust for your context. The numbers above assume twin-tip riding powered along.
One more tip: Wind range charts assume you want to ride comfortably powered. But as you improve, you may choose to ride slightly underpowered for practicing handlepasses (less yank) or overpowered for mega loops (more send). So “choosing the right kite size” can also depend on your session goals. Beginners and intermediates should stick to being nicely powered in the kite’s sweet spot, which is roughly the middle of its advertised wind range.
Use your judgment, always rig a kite you can comfortably control in the gusts, and remember that as you get better you’ll extend those ranges. But still, everyone has a limit where it’s just survival mode, find your fun vs. fear balance.
Oh, and check your lines and safety gear especially on high wind days, a line snap at 30 knots is not fun. Better to prevent than cure.
Before you grab your kite
Wind reading isn’t some mystical talent reserved for old salty sea dogs or meteorologists, it’s a skill any curious kiter can develop. By understanding the why behind the wind and observing the world around you, you’ll start to anticipate great sessions with uncanny accuracy.
To wrap up, here’s a pre-session ritual you can use every time before pumping your kite, combining everything we’ve covered:
Check the big picture: What’s the general forecast and pressure situation? Is a high or low in charge? Any fronts or storms on the map?
Scan the sky: Any obvious cloud clues? Clear blue, likely steady high-pressure wind or maybe light thermal? Building cumulus, thermal and possible instability? Dark clouds, storm coming? This sets your caution level.
Feel the wind & observe: Stand on the beach, feel the wind on your face. Determine the direction. Is it steady or puffy? Look at flags, trees, water whitecaps as we discussed. Cross-check with what was forecast. Sometimes just feeling it will tell you “hm, this is stronger than expected.”
Ask or watch locals: If others are setting up, see what they’re choosing. A quick chat, “Hey, what size are you rigging?”, can confirm your own assessment or provide insight. Local knowledge is pure gold.
Gear up wisely: Rig the kite size that suits the current wind with a nod to expected changes. If you know the wind usually builds, maybe rig one size down from what feels perfect at the moment, so you don’t get overpowered later. If it tends to die off, maybe take the bigger board or a slightly larger kite to extend your session. Double-check your lines and safety, strong wind or gusty conditions demand your quick-release works flawlessly.
Have a plan B: Especially in dodgy conditions, have a safety plan. If that storm line gets closer, I’ll come in immediately. Or If the wind swings offshore, I won’t stray far out. Share a plan with a buddy onshore if possible.
Respect mother nature: No session is worth putting yourself in serious danger. If everything’s screaming “don’t go”, trust that instinct. There will be other days. It’s better to miss a session than to become a rescue story.
And perhaps the most important step: Keep learning each time. After your session, think about what the wind did vs. what you thought would happen. Every success or surprise adds to your mental model. Over time, you’ll find yourself almost casually predicting, “I bet in an hour the wind will swing north with that cloud line”, and more often than not, you’ll be right.
Next time you head out, take this guide with you (even if just in the back of your mind). Do the ritual, read the invisible signs, and launch confidently. You’ll ride safer, score more sessions, and earn major bragging rights among your kite crew for your wind whisperer ways.
Now get out there and make the wind your ally.
xox Berito